Conquering the Cold: A Vermont Homeowner’s Guide to DIY Roof Replacement
The biting Vermont wind howls, carrying with it the threat of another heavy snowfall. For homeowners in the Green Mountain State, winter isn’t just a season; it’s a relentless test of their homes’ resilience. Nowhere is this truer than on the roof, the first line of defense against the elements. A failing roof can lead to costly water damage, energy inefficiency, and even structural problems. While professional roof replacement offers peace of mind, the cost can be prohibitive.
This guide provides a comprehensive, step-by-step approach for Vermont homeowners considering a DIY roof replacement, focusing on fire and wind resistance crucial for enduring the state’s unique climate. We’ll delve into material selection, safety protocols, and code compliance, empowering you to make an informed decision and potentially save thousands. But before diving into the specifics, let’s be clear: a DIY roof replacement is a significant undertaking, not for the faint of heart or those lacking confidence in their home improvement skills.
It demands meticulous planning, physical stamina, and a commitment to safety above all else. For Vermonters, the decision to tackle a DIY roof replacement often stems from a desire to save money and gain control over the project. The cost of professional Vermont roofing services can quickly escalate, especially when dealing with the challenges of snow load, ice dam prevention, and the need for fire resistant roofing materials. However, the savings come with a trade-off.
A DIY approach requires a substantial investment of time, often stretching over several weekends, and the acquisition of specialized tools like roofing nailers, safety harnesses, and material hoists. Furthermore, mistakes can be costly, potentially leading to leaks, structural damage, and voided warranties. A poorly installed roof can also decrease a home’s value and lead to higher insurance premiums. Therefore, a realistic assessment of your skills, time commitment, and risk tolerance is crucial before proceeding. Ultimately, the success of a DIY roof replacement hinges on thorough preparation and adherence to best practices.
This guide will walk you through every stage of the process, from assessing your existing roof and selecting appropriate materials like asphalt shingles or metal roofing to navigating Vermont building codes and implementing essential safety measures. We’ll also cover crucial aspects of roof maintenance, including ice dam prevention strategies and techniques for ensuring long-term wind resistance. By carefully considering each step and prioritizing safety, Vermont homeowners can confidently approach a DIY roof replacement and protect their homes from the harsh realities of the Green Mountain State’s climate.
Assess, Don’t Assume: Determining the Need for Roof Replacement
Before even considering a DIY roof replacement, a thorough assessment of the existing roof is paramount. Small leaks or damaged shingles might be addressed with targeted repairs, extending the roof’s lifespan without the need for a full replacement. Look for telltale signs of damage: curling or missing shingles, excessive granule loss (visible as dark patches), water stains on the interior ceiling, and moisture in the attic. Sagging roof sections are a serious concern, indicating potential structural issues that require immediate professional attention.
A ‘before’ analysis should include detailed photos and documentation of all observed damage. If the damage is widespread, affecting more than 25% of the roof’s surface, or if the roof is nearing the end of its expected lifespan (typically 20-30 years for asphalt shingles), replacement is likely the more cost-effective long-term solution. Remember, ignoring minor problems can lead to exponential damage down the line. In Vermont, the impact of snow load and ice dam formation makes this initial assessment even more critical.
According to the Vermont Agency of Natural Resources, homes in higher elevations and areas with significant snowfall are particularly vulnerable. A visual inspection from the ground using binoculars can reveal potential problem areas, but a closer inspection from a ladder is often necessary. Pay close attention to areas around chimneys, vents, and valleys, as these are common points of water intrusion. Consider hiring a professional inspector for a comprehensive evaluation, especially if you are uncomfortable working at heights or suspect structural damage.
They can identify hidden issues and provide valuable insights into the overall condition of your Vermont roofing. Furthermore, the type of existing roofing material will influence your assessment. While asphalt shingles are prevalent, some Vermont homes may have metal roofing, slate, or even wood shingles. Each material has its own set of potential problems. For example, metal roofing might show signs of rust or corrosion, while slate can crack or become dislodged. Understanding the specific vulnerabilities of your roof’s material is crucial for accurate diagnosis.
Document the extent of any visible damage with clear photographs and detailed notes. This documentation will not only help you determine whether DIY roof replacement is necessary but also provide valuable information when selecting replacement materials and applying for building permits, ensuring compliance with local building codes for your home improvement project. Finally, don’t underestimate the importance of attic inspection as part of your roof assessment. Water stains, mold growth, or damp insulation in the attic are clear indicators of a leaking roof, even if the damage isn’t immediately apparent from the outside.
Check for proper ventilation, as inadequate airflow can exacerbate moisture problems and contribute to ice dam prevention issues. A well-ventilated attic helps regulate roof temperature, preventing snow from melting and refreezing at the eaves. If you notice any signs of water damage or poor ventilation, address these issues promptly to prevent further damage and ensure the longevity of your roof. This proactive approach to roof maintenance will save you time and money in the long run, preserving your home’s value and protecting it from the harsh Vermont climate. Wind resistance of existing roofing should also be assessed.
Material Matters: Choosing the Right Roofing for Vermont’s Climate
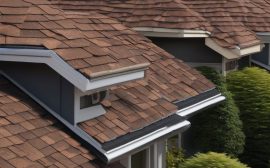
Vermont’s climate demands roofing materials engineered to withstand punishing snow loads, relentless high winds, and the ever-present threat of fire. Prioritizing materials with a Class A fire rating is non-negotiable for any Vermont roofing project, offering the highest level of protection against external fires. Asphalt shingles remain a popular choice for DIY roof replacement projects due to their relative affordability and ease of installation. However, homeowners should strongly consider architectural shingles, also known as dimensional shingles, for their enhanced durability and superior wind resistance – crucial in exposed Vermont locations.
These shingles offer a layered design that provides a more robust barrier against the elements and often come with extended warranties, making them a worthwhile investment for long-term home improvement. Metal roofing presents a premium alternative, albeit with a higher initial investment. Its superior longevity (often exceeding 50 years) and exceptional snow-shedding capabilities significantly reduce the risk of ice dam formation, a major concern for Vermont homeowners. Standing seam metal roofs, in particular, are designed to allow snow and ice to slide off easily, minimizing stress on the roof structure and preventing water damage.
According to the Metal Roofing Alliance, homes with metal roofs can see a significant reduction in roof maintenance costs over the lifespan of the roof, offsetting the higher upfront price. When considering metal, ensure compatibility with Vermont’s building codes, particularly regarding thermal expansion and contraction. Selecting the right material also hinges on understanding your roof’s pitch. Steeper roofs naturally shed snow more effectively, reducing the burden on the structure. Conversely, flatter roofs require materials specifically designed to handle standing water and ice accumulation.
Modifying asphalt shingles with specialized underlayment, like waterproof membranes, can provide an additional layer of protection against ice dams. A thorough ‘before’ analysis is crucial; evaluate your current roofing material’s performance, noting any weaknesses in wind resistance, snow load capacity, or susceptibility to ice damming. This assessment, coupled with local climate data and a realistic budget, will guide your decision toward the optimal roofing solution for your Vermont home. Remember that proper roof repair and diligent roof maintenance are vital, regardless of the material chosen, to ensure long-term performance and prevent costly issues down the road.
Code Compliance: Navigating Vermont’s Building Regulations
Navigating Vermont’s building codes and permit requirements is a crucial step in any DIY roof replacement project. Contact your local town or city’s permitting office to determine the specific regulations in your area. Generally, a permit is required for any roof replacement project involving structural changes or the use of different roofing materials. Be prepared to submit detailed plans outlining the scope of work, materials used, and compliance with building codes related to snow load, wind resistance, and fire safety.
Failure to obtain the necessary permits can result in fines and delays. Researching local ordinances *before* starting the project is essential to avoid costly mistakes and ensure compliance. Vermont roofing regulations are particularly stringent due to the state’s challenging climate. For example, building codes often specify minimum snow load requirements that vary depending on geographic location and roof pitch. These regulations dictate the structural capacity needed to withstand the weight of accumulated snow, directly impacting the choice of roofing materials and framing techniques for any DIY roof replacement.
Wind resistance is another critical factor, with codes mandating specific installation methods and shingle types to prevent blow-offs during high winds, a common occurrence in exposed areas of Vermont. Selecting fire resistant roofing materials, particularly Class A rated options, is also frequently mandated to enhance overall home safety. Moreover, Vermont’s emphasis on energy efficiency has led to building codes that address insulation and ventilation requirements in roofing projects. Proper attic ventilation is essential not only for preventing ice dam prevention but also for reducing energy consumption by maintaining a consistent roof temperature.
When applying for a permit, be prepared to demonstrate how your DIY roof replacement project will meet these energy efficiency standards. This might involve specifying the R-value of insulation materials or detailing the ventilation strategy employed. Ignoring these aspects can lead to permit rejection or the need for costly rework later on. For example, many homeowners are opting for metal roofing due to its longevity, fire resistance, and ability to handle heavy snow loads, but proper installation according to code is paramount.
Finally, consider that even seemingly minor roof repair projects may require permits in some Vermont municipalities. Before undertaking any work, it’s always best to err on the side of caution and contact your local permitting office. They can provide clarity on specific requirements and help you avoid potential headaches down the road. Furthermore, documenting each stage of the DIY roof replacement process with photos and detailed records can be invaluable if any questions arise during the inspection phase. Remember, compliance with building codes isn’t just about avoiding fines; it’s about ensuring the safety and longevity of your home improvement investment.
Safety First: Essential Precautions for DIY Roof Work in Winter
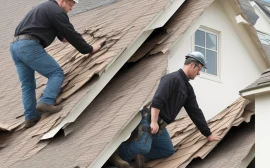
DIY roof replacement, especially in the challenging winter conditions of Vermont, demands an unwavering commitment to safety. Prioritize safety above all else; no shortcut is worth risking serious injury. Before even setting foot on your roof, meticulously inspect your ladder, ensuring it’s sturdy, equipped with rubber feet in good condition, and properly angled. A safety harness and rope system is not optional – it’s a critical investment that can prevent a fall. Secure the harness correctly and anchor the rope to a reliable point on the opposite side of the roof.
Non-slip roofing shoes are essential for maintaining traction on potentially slick surfaces. A hard hat will protect you from falling debris or accidental impacts. Remember, Vermont roofing presents unique challenges, and preparation is key to mitigating risk. Never attempt DIY roof replacement on a wet or icy roof. Clear snow and ice completely before commencing any work. Use a roof rake or plastic shovel to avoid damaging the underlying roofing material. Be acutely aware of overhead power lines; maintain a safe distance at all times, and if necessary, contact your local utility company to temporarily de-energize them.
Designate a spotter on the ground who can monitor your progress, provide assistance, and call for help in case of an emergency. Before walking on the roof, carefully assess its stability. Look for signs of sagging, rot, or water damage, which could indicate structural weaknesses. If you’re uncomfortable with any aspect of the work or the roof’s condition, do not proceed. Instead, seek the expertise of a qualified professional specializing in Vermont roofing and home improvement.
Investing in proper safety equipment and adhering to strict safety protocols is non-negotiable when undertaking a DIY roof replacement. A fall from a roof can have devastating consequences, leading to serious injury or even death. Furthermore, neglecting safety can also compromise the quality of your work. Rushing or taking shortcuts due to discomfort or fear can result in improperly installed roofing materials, leading to leaks, ice dam prevention failures, and premature roof failure. Remember to factor in the cost of safety equipment when comparing DIY vs. professional installation costs. Prioritizing safety not only protects your well-being but also ensures the longevity and effectiveness of your new roof, safeguarding your home from the harsh Vermont elements and contributing to effective roof maintenance for years to come. Consider fire resistant roofing options as part of your overall safety plan, especially in areas prone to wildfires.
Step-by-Step: Removing the Old Roof and Installing the New
Replacing a roof involves several key steps: removing the old roofing material, preparing the roof deck, and installing the new roofing. Start by carefully removing the old shingles or roofing material, working in small sections to maintain balance and control. Use a roofing shovel to pry up stubborn shingles, taking care not to damage the underlying roof deck. Vermont roofing presents unique challenges; years of snow load and ice can cause shingles to adhere more stubbornly than in milder climates.
A critical part of this phase is proper disposal of the old materials. Many Vermont towns have specific regulations regarding construction debris, so check with your local waste management authority to ensure compliance and explore recycling options for asphalt shingles, if available. Remember, a clean and organized workspace is a safe workspace, especially when dealing with heights. Inspect the roof deck for any signs of rot or damage and replace any compromised sections with new, code-compliant plywood.
Even seemingly minor imperfections can compromise the structural integrity of your new roof, especially under the weight of heavy snow. Ensure the deck is clean, dry, and free of debris before proceeding. This is the time to address any underlying issues that may have contributed to the previous roof’s failure. Consider applying a wood preservative to the exposed deck to further protect against moisture and decay, a common concern in Vermont’s damp climate. A thorough inspection and repair at this stage will contribute significantly to the longevity of your DIY roof replacement.
Install underlayment, following the manufacturer’s instructions meticulously. This provides an extra layer of protection against water intrusion, crucial for ice dam prevention and overall roof health in Vermont. Overlap the seams adequately and secure the underlayment with roofing nails. Consider using a self-adhering waterproof underlayment, particularly in vulnerable areas like eaves and valleys, for enhanced protection against ice dams. Finally, install the new roofing material, overlapping each course according to the manufacturer’s specifications. Pay close attention to flashing around chimneys, vents, and skylights.
Proper flashing is essential to prevent water from penetrating these vulnerable areas. For metal roofing, ensure proper grounding to protect against lightning strikes, a consideration often overlooked in DIY home improvement projects. A ‘before’ and ‘after’ comparison should show a structurally sound deck, properly installed underlayment, and a securely fastened, fire resistant roofing material, ready to withstand Vermont’s challenging weather conditions. Remember to consult Vermont’s building codes throughout the process to ensure your DIY roof replacement meets all requirements for wind resistance and snow load.
Ice Dam Prevention: Managing Water Runoff in Snowy Climates
Ice dams are a persistent challenge for homeowners in snowy climates like Vermont, often leading to costly roof repair and interior damage. These icy barriers form when melting snow refreezes at the roof’s edge, obstructing proper drainage and forcing water back under shingles, potentially causing leaks and structural issues. Effective ice dam prevention is a multifaceted approach, starting with understanding the underlying causes and implementing proactive measures during a DIY roof replacement. A critical first step involves a thorough ‘before’ analysis to identify areas prone to ice dam formation, such as poorly insulated sections or inadequate attic ventilation.
This allows for targeted preventative measures during installation, ensuring long-term protection against water damage. Proper attic ventilation is paramount in maintaining a consistent roof temperature and preventing premature snowmelt. Insufficient ventilation allows warm air to rise into the attic, warming the underside of the roof and causing snow to melt even when outside temperatures are below freezing. This melted water then flows down to the colder eaves, where it refreezes, initiating the ice dam formation.
Ensure adequate airflow by checking and clearing soffit vents and ridge vents, promoting a balanced temperature throughout the attic space. Many Vermont roofing experts recommend a combination of soffit and ridge vents to maximize airflow and minimize temperature variations, thereby reducing the likelihood of ice dam development. Improving insulation in the attic floor also helps to prevent heat from escaping into the attic space, contributing to a colder roof deck. Beyond ventilation, installing an ice and water shield underlayment is a crucial defense against water intrusion.
This waterproof membrane, typically applied along the eaves, valleys, and around roof penetrations, provides an extra layer of protection against water that may back up due to ice dams. Building codes in Vermont often mandate the use of ice and water shield in areas prone to ice damming. Furthermore, maintaining clean gutters is essential for ensuring proper water runoff. Clogged gutters can exacerbate ice dam formation by preventing melted snow and ice from draining away from the roof.
Heated cables, while a more energy-intensive solution, can also be strategically used to melt snow and ice along the eaves, creating channels for water to escape. When considering materials for your DIY roof replacement, remember that some, like metal roofing, are inherently more resistant to ice dam formation due to their smooth surfaces and ability to shed snow more easily than asphalt shingles. However, regardless of the material chosen, proactive ice dam prevention measures are crucial for long-term roof maintenance and protection against the harsh Vermont winters.
Cost Analysis: DIY vs. Professional Installation
The decision to DIY or hire a professional for Vermont roofing often hinges on a careful cost analysis. While a DIY roof replacement project promises significant savings on labor, potentially thousands of dollars, it’s crucial to factor in the hidden costs. Beyond the obvious material expenses, consider the investment in specialized tools, safety equipment, and disposal fees for the old roofing. Moreover, your time has value. According to a recent survey by the Vermont Home Builders Association, the average DIY roof replacement in Vermont takes homeowners 50-80 hours, spread over several weekends.
Is that time worth more spent elsewhere? “Homeowners often underestimate the sheer physical demand and time commitment of a DIY roof replacement,” notes Sarah Meeks, a licensed Vermont roofing contractor. “What seems like a simple weekend project can quickly turn into a multi-week ordeal, especially when unexpected issues arise.” Material costs are a significant component of any roofing project. For an asphalt shingles roof on a typical Vermont home, expect to spend between $3,000 and $6,000, depending on the quality and style of the shingles.
Architectural shingles, known for their enhanced durability and wind resistance, will command a higher price than standard three-tab shingles. Metal roofing, prized for its longevity and ability to withstand heavy snow load, represents a more substantial investment, potentially costing two to three times more than asphalt. Professional installation can add another $5,000 to $10,000 to the total cost, but this figure includes not only labor but also expertise, insurance, and warranty coverage. Obtaining multiple quotes from reputable Vermont roofing contractors is essential for comparison.
These quotes should clearly outline the scope of work, materials used, and warranty terms. Consider factors such as the contractor’s experience with fire resistant roofing and ice dam prevention techniques specific to Vermont’s climate. A critical aspect of the cost analysis is assessing the potential for errors. A poorly installed roof can lead to costly roof repair down the line, negating any initial savings from a DIY approach. Leaks, improper flashing, or inadequate ventilation can result in water damage, mold growth, and structural issues, leading to thousands of dollars in repairs.
Furthermore, improper installation can void manufacturer warranties on roofing materials. Before embarking on a DIY roof replacement, honestly evaluate your skills and experience. Are you comfortable working at heights? Do you have experience with carpentry and roofing techniques? Are you familiar with Vermont’s building codes and permit requirements? A ‘before’ analysis should include a detailed budget outlining all potential costs, both for DIY and professional installation, alongside a realistic assessment of your capabilities. Remember, the long-term performance of your roof, its ability to withstand snow load and wind resistance, and its effectiveness in ice dam prevention are paramount. Prioritizing quality and proper installation, whether DIY or professional, is a wise investment in your home’s future.
Long-Term Maintenance: Maximizing Roof Lifespan in Snowy Climates
Long-term roof maintenance is the cornerstone of a resilient home, especially in Vermont’s challenging climate, and is essential for maximizing its lifespan and preventing future damage. Regular attention to your roof, even after a successful DIY roof replacement, will pay dividends in preventing costly repairs down the line. Conduct biannual inspections, ideally in the spring and fall, checking meticulously for damaged or missing asphalt shingles, cracked flashing around chimneys and vents, and any signs of water intrusion in the attic.
These inspections are particularly important after periods of heavy snow load or high winds, common occurrences in Vermont. Addressing these issues promptly can prevent minor problems from escalating into major structural concerns, saving you significant expense and hassle in the long run. Remember, a proactive approach to roof maintenance is far more cost-effective than reactive repairs. Beyond visual inspections, proactive measures like gutter cleaning are paramount for effective roof maintenance. Clogged gutters prevent proper water runoff, leading to water pooling and potential ice dam prevention issues during the winter months.
Ice dams can force water under the shingles, causing leaks and damage to the underlying roof deck and even interior walls. Regularly clear gutters of leaves, twigs, and other debris, ideally twice a year or more frequently if you have many trees near your home. Consider installing gutter guards to minimize debris accumulation and reduce the frequency of cleaning. Furthermore, trim any nearby trees to prevent branches from rubbing against the roof, which can damage shingles and create pathways for pests.
Documenting all roof maintenance activities and roof repair efforts is crucial for tracking the roof’s condition and identifying potential problem areas. Maintain a detailed log of inspections, repairs, and any other work performed on the roof, including dates, descriptions of the work, and materials used. This documentation will be invaluable when assessing the overall health of your Vermont roofing system and can be helpful when filing insurance claims or selling your home. Consider taking ‘before’ and ‘after’ photos of any repairs to visually document the improvement. Furthermore, while DIY roof replacement and roof repair can save money, consider investing in professional roof cleaning services every few years to remove moss and algae, which can trap moisture and damage roofing materials over time. Prioritize fire resistant roofing materials and ensure compliance with local building codes to guarantee the longevity and safety of your home.