California Dreaming, Fire-Resistant Roofing: A DIY Guide to Wildfire Protection
The haunting orange glow of wildfire smoke against the California sky has become a chillingly familiar sight, a stark reminder of the ever-present threat faced by homeowners across the state. For those living in high-risk fire zones, the roof isn’t just a shelter; it’s the first line of defense against an inferno. While achieving a truly ‘fireproof’ roof is impossible, significantly enhancing its fire resistance is a crucial and achievable step towards safeguarding your home and family.
This comprehensive guide empowers homeowners with a practical, step-by-step approach to DIY fire-resistant roofing, providing the knowledge and resources to fortify against this growing threat. From understanding fire ratings and selecting appropriate materials to mastering installation techniques and navigating California’s stringent building codes, we’ll equip you with the tools to make informed decisions and take proactive steps towards greater home safety. This isn’t just about protecting your property; it’s about peace of mind. The increasing frequency and intensity of California wildfires, fueled by drought and climate change, demand a proactive approach to home protection.
According to the California Department of Forestry and Fire Protection (CAL FIRE), over 7,000 wildfires scorched more than 2.5 million acres in 2020 alone, underscoring the urgent need for effective mitigation measures. Embracing a DIY approach to fire-resistant roofing allows homeowners to take direct control of their safety, often at a lower cost than hiring a professional. However, it’s crucial to prioritize safety and adhere to best practices throughout the process. This guide will cover essential safety precautions, including the use of proper safety equipment and fall protection systems.
Choosing the right fire-resistant roofing material is paramount. Options range from Class A rated asphalt shingles with enhanced fire retardant properties, to more robust choices like clay or concrete tiles, and standing seam metal roofing. Each material offers a different level of fire protection, lifespan, and aesthetic appeal. Understanding the trade-offs between cost, durability, and ease of installation is essential for making an informed decision that aligns with your budget and long-term goals. For instance, while metal roofing may have a higher upfront cost, its exceptional fire resistance and longevity can offer significant long-term savings.
This guide will delve into the specifics of each material, outlining their advantages and disadvantages to help you make the best choice for your home. Beyond the roofing material itself, consider other critical aspects of wildfire protection, such as creating defensible space around your property and ensuring proper attic ventilation. Clearing vegetation and removing flammable debris within a 100-foot radius of your home can significantly reduce the risk of fire spread. Proper attic ventilation helps prevent heat buildup, lowering the likelihood of ignition from airborne embers.
Additionally, installing ember guards in gutters and vents can prevent embers from lodging and igniting dry leaves or debris. By integrating these preventative measures with a fire-resistant roof, you create a comprehensive defense system against wildfire threats. This guide will provide a step-by-step overview of the DIY roofing process, including detailed instructions on preparing the roof deck, installing underlayment, and securing the chosen roofing material. We’ll also address the importance of adhering to California’s specific building codes and regulations for wildfire zones, ensuring your project meets the required safety standards. Remember, thorough preparation, attention to detail, and adherence to safety guidelines are paramount for a successful and safe DIY roofing project.
Decoding Fire Ratings: Class A, B, and C Explained
Understanding fire ratings is crucial in selecting the right roofing material, especially in California’s wildfire-prone areas. These ratings, primarily Class A, Class B, and Class C, are determined through standardized tests that simulate fire exposure, assessing a material’s ability to resist flames and prevent fire spread. These tests, conducted by organizations like Underwriters Laboratories (UL), involve subjecting roofing materials to direct flame, intermittent flame, and burning brand tests. The goal is to evaluate how long a material can withstand these conditions before igniting or allowing fire to penetrate the roof deck, thereby protecting the structure below.
Choosing a higher fire rating is a critical step in enhancing your home’s wildfire protection. Class A offers the highest level of protection, capable of withstanding severe fire exposure. This means the material resists ignition and spread of flames under intense heat and direct flame impingement for a specified duration. Class B provides moderate protection, offering resistance to less severe fire exposure than Class A. Finally, Class C offers minimal protection against light fire exposure, suitable only for areas with very low fire risk, which are increasingly rare in California.
In practical terms, a Class A roof is more likely to survive exposure to wind-blown embers from a nearby wildfire, while a Class C roof might quickly ignite, endangering the entire home. Given the increasing intensity and frequency of California wildfires, Class A roofing is the recommended standard for most homeowners. Here’s a comparison table of common roofing materials and their fire ratings: | Material | Fire Rating | Notes |
| ——————– | ———– | ————————————————————————————————————————————– |
| Clay Tiles | Class A | Excellent fire resistance; durable but heavy. |
| Concrete Tiles | Class A | Similar to clay tiles; can be more cost-effective. |
| Metal Roofing | Class A | Lightweight and durable; reflects heat effectively.
Consider aluminum or steel with a fire-resistant coating. |
| Asphalt Shingles (UL Class A Rated) | Class A | Some asphalt shingles achieve Class A rating with specific underlayment. Check manufacturer specifications carefully. |
| Slate Roofing | Class A | Extremely durable and fire-resistant; very expensive. |
| Wood Shakes/Shingles | Class C (or Untreated) | Generally not recommended in high-fire-risk areas unless treated with fire retardants and maintained diligently. Many jurisdictions ban untreated wood roofing. |
*Important Note:* Always verify the specific fire rating of a product with the manufacturer’s documentation. Installation methods also significantly impact the overall fire resistance of a roofing system. Using the wrong underlayment, for example, can negate the fire resistance of even a Class A shingle. For example, even a Class A rated asphalt shingle will fail prematurely if installed over a non-fire-resistant underlayment. This is because the underlayment, the layer directly beneath the shingles, acts as a crucial barrier against heat and flame.
Opting for a fire-resistant underlayment, often made of fiberglass or other specialized materials, provides an additional layer of wildfire protection and ensures the entire roofing system performs as intended. Beyond the roofing material and underlayment, proper roofing installation plays a vital role in achieving the stated fire rating. Gaps or poorly sealed seams can create vulnerabilities where embers can lodge and ignite the roof deck. When undertaking a DIY roofing project, meticulously follow the manufacturer’s installation guidelines, paying close attention to overlapping seams, flashing around chimneys and vents, and securing the roofing material to the roof deck.
Consider consulting with a professional roofing contractor, especially if you are unfamiliar with roofing installation techniques, to ensure the job is done correctly and meets local building codes. Proper installation not only enhances fire resistance but also extends the lifespan of your roof and prevents costly repairs down the road. Furthermore, selecting heat resistant shingles is only one component of a comprehensive wildfire defense strategy. Maintaining a defensible space around your home, free of dry vegetation and debris, is equally important.
Embers can travel long distances ahead of a wildfire, igniting flammable materials near your home. Regularly clearing gutters of leaves and pine needles, trimming trees and shrubs away from the roof, and removing combustible materials from under decks and porches can significantly reduce the risk of ignition. Combining a Class A fire-rated roof with a well-maintained defensible space provides the best possible protection against the devastating effects of California wildfires, enhancing home safety and providing peace of mind.
Selecting the Ideal Fire-Resistant Roofing Material
Choosing the right fire-resistant roofing material requires careful consideration of several factors, including cost, durability, aesthetics, ease of installation, and adherence to California’s stringent building codes. These factors are crucial for homeowners in wildfire-prone areas, where the roof acts as the first line of defense against intense heat and wind-driven embers. Making an informed decision involves balancing upfront expenses with long-term value, aesthetic preferences with fire safety requirements, and the feasibility of DIY installation with the expertise of professional roofing contractors.
Navigating these considerations is essential for fortifying your home against the increasing threat of wildfires. Cost is often a primary concern for homeowners. While asphalt shingles typically have a lower initial cost, their lifespan is significantly shorter than more fire-resistant options like metal, tile, or composite roofing. Metal roofing and tiles, while carrying a higher upfront investment, offer superior longevity, often lasting decades with minimal maintenance. This long-term durability translates to potential cost savings over time, making them a worthwhile investment despite the initial higher price tag.
Considering the lifecycle cost, which includes installation, maintenance, and replacement over time, often reveals the true value of fire-resistant roofing materials. Durability is paramount in wildfire zones. Clay, concrete, and metal roofs are renowned for their resilience against extreme weather conditions, including high winds, hail, and fire. These materials are less susceptible to cracking, warping, and degradation, providing long-lasting protection for your home. Metal roofs, for example, can withstand wind speeds exceeding 100 mph and have a Class A fire rating, the highest available.
Concrete and clay tiles also offer excellent fire resistance and are incredibly durable, lasting 50 years or more. When selecting a material, consider its resistance to impact, fire spread, and ember penetration, vital factors in wildfire-prone regions. Aesthetic appeal should not be sacrificed for fire safety. Fortunately, a wide variety of fire-resistant roofing materials are available in various colors, styles, and textures to complement any architectural design. Metal roofing, for instance, comes in numerous profiles, from traditional standing seam to modern corrugated styles.
Concrete and clay tiles offer a range of colors and finishes, mimicking the look of slate, wood shake, or traditional tile. Choosing a material that enhances your home’s curb appeal while providing crucial fire protection is a win-win situation. Ease of installation directly impacts the overall project cost. Asphalt shingles are generally easier and faster to install than tile or metal, making them a potentially more accessible DIY option for experienced homeowners. However, improper installation can compromise fire resistance and void warranties.
Metal and tile roofing installations are more complex and typically require specialized tools and expertise. For these materials, hiring a qualified and licensed roofing contractor is highly recommended to ensure proper installation and maximize fire protection. Always prioritize safety and consider your skill level when deciding between DIY and professional installation. Specific product recommendations within each category offer further guidance. For metal roofing, consider options like Decra Roofing Systems, known for their stone-coated steel tiles that combine durability and aesthetics.
In the concrete tile category, Boral Roofing offers a variety of styles and colors with excellent fire ratings. For Class A asphalt shingles, CertainTeed Landmark Pro and GAF Timberline HDZ remain popular choices, but it is crucial to verify their compatibility with a Class A rated underlayment. Using the wrong underlayment will negate the fire-resistant properties of the shingles. Remember, consulting with local roofing professionals and obtaining multiple quotes is essential to ensure you’re getting the best value and quality for your specific needs.
Finally, understanding California’s building codes and regulations is paramount. Title 24 of the California Building Code outlines specific requirements for roofing materials in wildfire-prone areas. These codes dictate the required fire rating for roofing materials, emphasizing the use of Class A rated products. Compliance with these regulations is not only necessary for obtaining building permits but also crucial for ensuring the safety and insurability of your home. Always consult with local building officials and experienced roofing contractors to ensure your chosen materials and installation methods meet all applicable codes and regulations. By carefully considering these factors, homeowners in California’s fire-prone areas can make informed decisions about their roofing, protecting their homes and families from the devastating impact of wildfires.
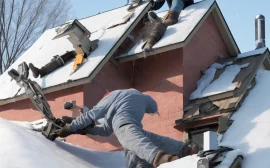
DIY Fire-Resistant Roofing: A Step-by-Step Guide
Disclaimer:
Roofing work can be dangerous, especially given the heights involved and the potential for falls. If you’re not comfortable working at heights, lack experience with roofing installation, or have any doubts about your ability to perform the work safely and correctly, it’s crucial to hire a qualified professional roofing contractor. Remember, improper installation can compromise the fire resistance of your roof and even void warranties. Always prioritize safety above all else; the risks associated with DIY roofing are significant, particularly in California wildfire zones.
Neglecting safety can lead to serious injury or even death. Consult with a professional before undertaking any DIY roofing project.
Tools and Materials:
* Safety glasses, gloves, and a hard hat: Essential for personal protection against debris, sharp objects, and falls.
* Roofing harness and lifeline: A critical safety measure to prevent falls from the roof. Ensure it’s properly fitted and anchored.
* Ladder with stabilizers: Provides a stable and secure access point to the roof.
Stabilizers prevent the ladder from slipping.
* Hammer or nail gun: Used to fasten roofing materials. A nail gun speeds up the process but requires careful handling.
* Utility knife: For cutting roofing materials and underlayment.
* Measuring tape: Accurate measurements are crucial for proper installation and material usage.
* Chalk line: Creates straight lines for shingle alignment, ensuring a professional-looking finish.
* Underlayment (Class A rated, if required for your chosen shingle): Provides an additional layer of protection against water intrusion and enhances fire resistance.
Class A rated underlayment offers the highest level of fire protection.
* Fire-resistant roofing material (shingles, tiles, or metal): The primary defense against fire. Choose a material that meets Class A fire rating standards.
* Roofing nails or screws (compatible with your chosen material): Use fasteners specifically designed for roofing to ensure a secure and long-lasting installation. Check compatibility with your chosen material to prevent corrosion or damage.
* Flashing (for chimneys, vents, and valleys): Prevents water leaks around vulnerable areas of the roof.
Use fire-resistant metal flashing for added protection.
Step-by-Step Installation Guide (Asphalt Shingles – Example):
1.
Remove Existing Roofing:
Carefully remove the old roofing material, exposing the roof deck. Use a roofing shovel to speed up the process. Dispose of the old materials properly, following local regulations. Consider renting a dumpster for large projects.
2.
Inspect and Repair Roof Deck:
Check the roof deck for any damage (rot, soft spots). Probe suspicious areas with a screwdriver.
Replace damaged sections with new plywood or OSB of the same thickness. Secure the new sheathing with screws for added strength. This step is crucial for ensuring the longevity and stability of your new roof, especially in areas prone to high winds or seismic activity.
3.
Install Underlayment:
Roll out the underlayment, overlapping each course according to the manufacturer’s instructions. Overlapping ensures proper water runoff. Secure it with roofing nails, using the correct nail pattern.
Pay close attention to valleys and eaves, as these areas are particularly vulnerable to water damage. Consider using a synthetic underlayment for enhanced durability and water resistance.
4.
Install Drip Edge:
Install drip edge along the eaves and rakes (sides) of the roof to prevent water from wicking back under the shingles and causing rot. Overlap the drip edge at the corners and secure it with roofing nails. The drip edge should extend slightly over the gutter to direct water away from the fascia board.
This seemingly small detail can significantly extend the life of your roof by preventing water damage.
5.
Install Flashing:
Install flashing around chimneys, vents, and valleys to prevent water leaks. Use step flashing along walls and counter flashing on the chimney. Ensure proper sealing with roofing sealant. Pay close attention to detail, as leaks in these areas can cause significant damage to your home’s interior. Consider using copper flashing for its durability and resistance to corrosion.
6.
Install Starter Course:
Install a starter course of shingles along the eaves, following the manufacturer’s instructions.
The starter course provides a seal and a level base for the first course of shingles. Use a self-adhesive starter course for added protection against wind uplift. This helps prevent shingles from being blown off during high winds, a common concern in California wildfire zones.
7.
Install First Course:
Begin installing the first course of shingles, aligning them with the starter course and securing them with roofing nails. Use the chalk line to ensure straight lines and maintain proper alignment.
Drive the nails straight and flush with the shingle surface. Overdriving or underdriving nails can compromise the shingle’s performance. Adhere to the manufacturer’s nailing pattern for optimal wind resistance.
8.
Continue Installing Courses:
Continue installing courses of shingles, overlapping each course according to the manufacturer’s instructions. Stagger the joints to prevent water penetration and create a more visually appealing roof. Use a consistent overlap to maintain a uniform appearance. Check your work frequently to ensure proper alignment and nailing.
9.
Install Ridge Cap:
Install ridge cap shingles along the ridge of the roof, overlapping each cap shingle and securing them with roofing nails.
The ridge cap protects the peak of the roof from water intrusion. Use a ridge vent to improve attic ventilation and reduce heat buildup. This can help extend the life of your roof and reduce energy costs.
10.
Clean Up:
Remove any debris and dispose of waste materials properly. Use a magnetic nail sweeper to collect any stray nails. Inspect the roof for any missed nails or damaged shingles. A thorough cleanup ensures a safe and professional-looking finished product.
*Visual Aids:* Include images and diagrams illustrating each step. Consider embedding a YouTube video demonstrating asphalt shingle installation. Search for “Asphalt Shingle Installation DIY” on YouTube for suitable videos. Link to the video within the article. *Safety Precautions:* Always work with a partner. Be aware of weather conditions (avoid working in high winds or rain). Use proper fall protection equipment. Wear appropriate personal protective equipment (PPE). Before starting, thoroughly inspect your ladder for stability and proper placement.
Securely anchor the ladder to prevent movement. Never work on a wet or icy roof, as this significantly increases the risk of slipping. If using a nail gun, wear safety glasses and ear protection. Always be mindful of your surroundings and avoid distractions. Regularly check your safety harness and lifeline for wear and tear. When working near power lines, maintain a safe distance to prevent electrocution. For added safety, consider using a drone to inspect your work from the ground and identify any potential issues.
In the context of California wildfires, selecting heat resistant shingles becomes crucial. Consider Class A rated shingles designed to withstand extreme temperatures. Furthermore, ensure that your roofing system includes ember resistant roofing features, such as sealed eaves and valleys, to prevent embers from igniting the roof structure. Remember to always check local building codes and regulations before commencing any DIY roofing project. Chapter 7A of the California Building Code (CBC) specifically addresses fire-resistant construction requirements for buildings in wildfire-prone areas. Compliance with these codes is essential for ensuring your home’s safety and protecting it from wildfire damage.
Beyond Materials: Protecting Your Roof from Heat and Smoke
Beyond the roofing material itself, a multifaceted approach to heat and smoke mitigation is crucial for enhancing your roof’s wildfire resilience. Implementing these measures significantly improves your home’s defense against the devastating impact of California wildfires. Attic ventilation plays a critical role in regulating temperature and preventing heat buildup, a key factor in reducing the risk of ignition. A well-ventilated attic allows hot air to escape, preventing the roof deck from reaching a critical temperature that could ignite dry debris or the roofing material itself.
Ensure adequate intake vents along the soffits or eaves and exhaust vents at or near the ridge. This continuous airflow minimizes heat trapping and creates a thermal buffer against extreme external temperatures. For DIYers, installing additional vents or upgrading existing ones is a manageable project that yields substantial fire safety benefits. Consult with a roofing professional to determine the optimal ventilation configuration for your specific roof design and climate. Protecting your home from wind-blown embers, a primary cause of home ignitions during wildfires, is paramount.
Installing ember guards, also known as gutter guards or screens, is a crucial step. These metal mesh screens fit over gutters, vents, and other openings, preventing embers from entering your home and igniting flammable materials within the attic or walls. Opt for non-combustible metal mesh with small openings to effectively block even tiny embers. Regularly cleaning these guards ensures unobstructed airflow and prevents debris buildup, which itself can pose a fire hazard. Regular roof maintenance is a year-round commitment that becomes even more critical in wildfire-prone areas.
Inspect your roof regularly, ideally twice a year, for signs of damage such as cracks, missing or damaged shingles, and gaps around vents and chimneys. Promptly repair any damage to maintain the roof’s structural integrity and fire resistance. Remove accumulated debris like leaves, pine needles, and branches from the roof and gutters. This debris can readily ignite from embers, creating a direct threat to your home. Consider professional roof inspections, especially before the peak wildfire season, to identify potential vulnerabilities and ensure your roof is in optimal condition to withstand fire exposure.
Specialized fire-retardant coatings offer an additional layer of protection by creating a thermal barrier on the roof surface. These intumescent coatings expand when exposed to high temperatures, forming a char layer that insulates the underlying roofing material and slows the spread of flames. While professional application is often recommended for optimal coverage, some fire-retardant coatings are available for DIY application. Consult with a roofing professional to determine the best coating for your roof type and local fire conditions.
Sealing gaps and cracks in the roof and around vents and chimneys is a critical fire safety measure. These seemingly small openings can serve as entry points for wind-blown embers, allowing them to reach vulnerable areas within the attic or living spaces. Use fire-resistant sealant or mortar to seal any gaps or cracks, paying close attention to areas around vents, chimneys, skylights, and other roof penetrations. This meticulous sealing creates a robust barrier against ember intrusion, significantly reducing the risk of ignition from within. Integrating these measures with the selection of fire-resistant roofing materials creates a comprehensive defense system against the ever-present threat of wildfires in California. By taking a proactive and holistic approach to wildfire safety, homeowners can significantly enhance their home’s resilience and safeguard their families and properties.
Navigating California Building Codes and Regulations
Roofing projects in California’s wildfire zones are subject to a complex web of building codes and regulations, all designed to bolster fire safety and protect homes from the devastating impact of California wildfires. Navigating these regulations is a critical step for any homeowner undertaking a DIY roofing project or hiring a contractor. These codes aren’t merely suggestions; they are legally binding requirements intended to minimize the risk of ignition and spread of fire, especially crucial in Wildland-Urban Interface (WUI) areas where homes meet or intermingle with undeveloped wildland.
Ignoring these regulations can lead to significant fines, project delays, and, most importantly, increased vulnerability to wildfire damage. Understanding the nuances of these codes is paramount for ensuring both compliance and enhanced home safety. The cornerstone of fire-resistant construction in California is the
California Building Code (CBC)
. The CBC adopts the International Building Code (IBC) but incorporates California-specific amendments tailored to address the state’s unique environmental challenges, particularly the threat of wildfires. Chapter 7A of the CBC is of particular importance, as it details specific fire-resistant construction requirements applicable to new buildings and alterations, including re-roofing projects, within designated wildfire-prone zones.
This chapter specifies acceptable roofing materials, installation methods, and other crucial details designed to minimize the risk of fire penetration. For example, it might mandate the use of Class A roofing materials, ember-resistant vents, and specific underlayment types to create a more robust fire barrier. Failing to adhere to Chapter 7A can have serious ramifications, including the inability to obtain occupancy permits or insurance coverage. Beyond the CBC, many cities and counties in California have adopted more stringent
Wildland-Urban Interface (WUI) codes
that go above and beyond the state’s minimum requirements.
These local codes often reflect the specific fire hazards and environmental conditions prevalent in a particular region. For instance, a community nestled in the Sierra Nevada foothills might have stricter requirements for defensible space and ember-resistant roofing than a coastal community with lower wildfire risk. These WUI codes may dictate the type of fire-resistant materials allowed, prescribe specific installation techniques for roofing and siding, and even regulate landscaping practices to create a buffer zone around the home.
Homeowners should proactively investigate their local WUI codes to ensure full compliance, as these regulations are often more detailed and demanding than the statewide CBC. Before embarking on any DIY roofing installation or hiring a contractor, securing the necessary
permits and scheduling inspections
is non-negotiable. Most roofing projects, even seemingly minor repairs, require a building permit from your local building department. The permit application process typically involves submitting detailed plans outlining the scope of work, the materials to be used, and the methods of installation.
Obtaining a permit ensures that the project is subject to inspection by a qualified building official who will verify compliance with all applicable building codes and regulations. These inspections are crucial for identifying potential safety hazards and ensuring that the roofing system is properly installed to provide maximum fire protection. Remember, attempting to bypass the permit process can result in hefty fines, stop-work orders, and even legal action. To navigate this complex regulatory landscape effectively, homeowners should leverage available
official resources
.
The
California Building Standards Commission (CBSC)
([https://www.dgs.ca.gov/CBSC](https://www.dgs.ca.gov/CBSC)) provides valuable information on state building codes, including the CBC and related regulations. Their website offers access to code publications, amendments, and other helpful resources. However, remember that the CBSC sets the baseline; your
local building department
holds the key to understanding specific requirements in your area. Contacting your city or county building department directly is essential for obtaining detailed information on local WUI codes, permit requirements, and inspection procedures.
Search online for “[Your City/County] Building Department” to find contact information and online resources. Furthermore, consulting with a qualified roofing contractor experienced in fire-resistant roofing and local building codes can provide invaluable guidance and ensure that your project meets all necessary requirements. They can help you select appropriate fire-resistant materials like Class A roofing, heat resistant shingles, or ember resistant roofing, and ensure proper roofing installation techniques that maximize wildfire protection. *Important Note:* Failure to comply with building codes can result in fines and delays.
It’s essential to understand the requirements in your area and obtain the necessary permits before starting any roofing project. Consult with a local building official or a qualified roofing contractor for guidance. Remember that choosing the right fireproof roofing materials and implementing defensible space strategies are key components of a holistic approach to home safety in California’s wildfire-prone regions. Prioritize your family’s safety by ensuring your roofing project adheres to all applicable regulations and best practices for wildfire protection.
Landscaping and Defensible Space: A Holistic Approach to Wildfire Protection
Protecting your home from the devastating impact of California wildfires necessitates a comprehensive approach that extends beyond just the roofing material. Creating defensible space, informed landscaping choices, and meticulous vegetation management are crucial elements of a robust wildfire defense strategy. Implementing these measures significantly reduces the risk of ember ignition and fire spread, safeguarding your property and loved ones. Defensible space, as defined by CAL FIRE, acts as a buffer zone between your home and surrounding vegetation, disrupting a wildfire’s path and providing firefighters a safe operational area.
This involves strategically managing vegetation within a minimum 100-foot radius around your structure, subdivided into zones with varying vegetation clearance requirements. The first zone, extending 5 feet from the structure, demands complete removal of all flammable materials, including dry leaves, pine needles, and firewood. The next zone, stretching from 5 to 30 feet, necessitates removing dead plants, low-hanging branches, and highly flammable shrubs, while spacing remaining trees to minimize fire spread. Beyond 30 feet and up to 100 feet, the focus shifts to reducing fuel volume by thinning trees and clearing brush, creating vertical and horizontal spacing to interrupt fire’s progression.
Beyond the 100-foot perimeter, maintaining reduced fuel loads remains important, particularly in areas with steep slopes or dense vegetation. Strategic landscaping choices further bolster your home’s defenses. Opting for fire-resistant plants, such as succulents, California fuchsia, and rockrose, reduces the risk of ignition and fire spread. These plants possess inherent qualities like high moisture content, low sap or resin levels, and less flammable foliage. Avoid highly flammable plants like juniper, eucalyptus, and ornamental grasses, especially near the house.
Regularly clear dry leaves and debris, and maintain appropriate spacing between plants to limit fire’s lateral movement. Proper irrigation plays a vital role in maintaining vegetation moisture, particularly during dry periods. A well-designed irrigation system can help prevent plants from becoming dry fuel, slowing or even halting the advance of a wildfire. Drip irrigation or soaker hoses are particularly effective, delivering water directly to the roots while minimizing evaporation. Complementing these measures, incorporating hardscaping elements like gravel pathways, concrete patios, and paver driveways creates non-combustible barriers against fire spread.
These materials offer superior fire resistance compared to wood or other flammable landscaping materials. Regular tree trimming is paramount, removing dead branches and ensuring adequate clearance between trees and structures, particularly the roof and power lines. This prevents embers from igniting overhanging branches and reduces the risk of fire spreading to your home. By diligently implementing these landscaping and defensible space strategies, you create a robust defense against the ever-present threat of wildfires, fortifying your home and enhancing its resilience in the face of California’s fire-prone environment. Consult with local fire authorities and landscaping professionals to tailor these recommendations to your specific property and regional fire risks, ensuring your home is well-prepared for wildfire season and beyond.
Fortifying Your Home: A Call to Action
Protecting your home from the increasing threat of California wildfires demands a proactive, multifaceted approach that extends beyond simply hoping for the best. It requires a comprehensive understanding of fire-resistant roofing materials, proper installation techniques, defensible space creation, and adherence to California’s stringent building codes. By taking decisive action now, you can significantly reduce your home’s vulnerability and safeguard your family’s future. This proactive approach begins with understanding that a truly “fireproof” roof is a misnomer; the goal is to create a highly fire-resistant structure capable of withstanding ember attacks and radiant heat.
Choosing Class A roofing materials like metal, tile, or composite shingles is paramount. These materials have undergone rigorous testing and demonstrated superior performance against fire spread. However, material selection is just the first step. Proper installation is critical to ensure the integrity of your fire-resistant roof. For DIY enthusiasts, meticulous attention to detail is essential, including securing underlayment, sealing gaps, and using appropriate fasteners. Consult our comprehensive checklist for fireproofing your roof to ensure no critical steps are missed.
Furthermore, integrating ember guards in gutters and vents can prevent embers from lodging in vulnerable areas and igniting dry debris. Beyond the roof itself, creating defensible space is a crucial aspect of wildfire protection. This involves clearing vegetation within a 100-foot radius of your home, creating zones with varying levels of vegetation management. This practice disrupts fire’s path and reduces the risk of flames reaching your house. California’s unique wildfire challenges necessitate strict adherence to building codes, specifically Chapter 7A of the California Building Code (CBC), which addresses fire-resistant construction.
These regulations dictate specific requirements for roofing materials, attic ventilation, and other fire safety measures. Consulting with local building officials is vital to ensure your roofing project meets all requirements and qualifies for any available fire mitigation incentives or insurance discounts. Investing in fire-resistant roofing and implementing these preventative measures might seem costly upfront, but the potential devastation of a wildfire far outweighs the financial investment. Consider it an investment in peace of mind, knowing you’ve taken significant steps to protect your home and family from the ever-present threat of wildfires. Remember, staying informed about local fire conditions and community preparedness programs is an ongoing commitment. By combining a proactive mindset with the right materials and techniques, you can fortify your home against wildfire risks and create a safer future for your family and community. Download our comprehensive checklist for fireproofing your roof (link to checklist) as a starting point for your wildfire preparedness plan. Stay informed, stay prepared, and stay safe.