DIY Roof Structural Integrity Assessment: A Step-by-Step Guide
Protecting your home starts from the top down—literally. Your roof is the first line of defense against the elements, and its structural integrity is paramount to safeguarding your investment and ensuring the safety and comfort of your family. Regular roof assessments are an essential aspect of home maintenance, allowing you to identify and address minor issues before they escalate into costly repairs or even catastrophic failures. This comprehensive guide empowers homeowners to conduct a DIY roof structural integrity assessment, covering essential steps from ground-level visual inspections to understanding key structural elements and recognizing signs of potential damage.
By taking a proactive approach to roof maintenance, you can extend the lifespan of your roof, prevent costly repairs, and maintain the overall value of your property. Think of your roof as a complex system of interconnected components, each playing a crucial role in protecting your home. From the shingles that shield against rain and wind to the underlying sheathing, rafters, and trusses that provide structural support, every element must be in good condition to ensure optimal performance.
A small leak, a missing shingle, or a weakened rafter can compromise the entire system, leading to water damage, mold growth, and even structural instability. This DIY roof assessment guide will equip you with the knowledge and tools to identify these potential problems early on, allowing you to take timely action and prevent further damage. This guide provides a practical, step-by-step approach to assessing your roof’s condition. We’ll begin with a visual inspection from the ground, using binoculars to identify obvious signs of damage or wear.
Then, if it’s safe to do so, we’ll guide you through a closer inspection on the roof itself, focusing on key areas like flashing, shingles, and vents. Understanding the underlying structure of your roof – the rafters, trusses, and sheathing – is critical for identifying potential weaknesses. We’ll cover this in detail, explaining how these elements work together and what to look for during your inspection. Finally, we’ll discuss common causes of roof damage, such as water infiltration, age, and impact from storms, and offer practical tips for preventative maintenance.
This guide includes valuable homeowner tips and roofing tips, providing a practical roofing guide for performing a DIY roof assessment. Throughout the process, we’ll emphasize the importance of safety, reminding you to prioritize your well-being and consult a professional when necessary. While a DIY roof inspection is a valuable tool for homeowners, it’s crucial to understand its limitations. This guide is not a substitute for a professional roof inspection, especially if you are dealing with extensive damage, significant sagging, or suspect structural issues.
If you encounter any complex problems or are unsure about your roof’s condition, consulting a qualified roofing contractor or structural engineer is always recommended. They have the expertise and equipment to conduct a thorough assessment and provide expert recommendations for repairs or replacements. Regular roof inspections, whether DIY or professional, are a crucial aspect of home maintenance and contribute significantly to protecting your investment and maintaining the structural integrity of your home. Documenting your findings with photos and detailed notes is essential for tracking the condition of your roof over time and can be invaluable when consulting with professionals or filing insurance claims.
This home inspection roofing guide is designed to give homeowners a better understanding of their roof’s structural integrity, enabling them to conduct a DIY roof assessment and address roof damage proactively. By understanding the principles of roof structural integrity and following the steps outlined in this guide, you can take an active role in maintaining your home’s most important protective barrier. Remember, preventative measures, such as regular cleaning, debris removal, and addressing minor repairs promptly, can significantly extend the life of your roof and prevent costly problems down the line. This DIY roof inspection, combined with appropriate home maintenance, provides valuable roofing tips for homeowners interested in protecting their homes.
Visual Inspection from the Ground
The initial step in any DIY roof assessment is a thorough visual inspection from the ground, a crucial part of home maintenance. This preliminary survey allows homeowners to identify potential issues without the immediate need for climbing onto the roof. Begin by scanning the entire roof surface, paying close attention to the roofline. Look for any signs of sagging, which could indicate structural problems such as weakened rafters or trusses. Unevenness or dips in the roof plane are often early indicators of more significant issues.
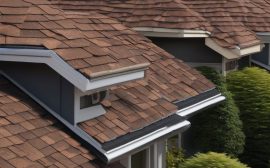
Additionally, note the condition of the shingles; missing, cracked, or curled shingles not only compromise the roof’s water resistance but can also point to underlying structural weaknesses. This initial roof inspection is a foundational step in maintaining the structural integrity of your home. When conducting your ground-level roof inspection, pay particular attention to areas where the roof intersects with other structures. Chimneys, vents, and skylights are common trouble spots due to the complex flashing required to seal these areas effectively.
Check for any gaps, cracks, or deterioration in the flashing material, which is usually metal or a specialized sealant. These breaches can allow water to seep into the roof structure, causing rot and weakening the surrounding materials. Look closely at the base of chimneys for crumbling mortar or gaps that could indicate structural instability or water intrusion. A good pair of binoculars can be invaluable for this task, allowing you to get a closer look at these hard-to-reach areas and identify potential roof damage that might otherwise be missed.
Beyond specific structural elements, observe the overall condition of the roof covering itself. Note any variations in shingle color or texture, which could signify areas of recent repair or uneven weathering. Dark patches on the shingles might indicate mold or algae growth, which can retain moisture and accelerate the deterioration process. Also, be mindful of the gutters and downspouts. Clogged gutters can cause water to back up and overflow, potentially leading to water damage along the roofline and fascia.
This is a key area for home maintenance, as addressing these issues early can prevent more serious problems. A thorough roof inspection from the ground, with attention to these details, can provide a valuable overview of your roof’s condition and help you prioritize any necessary roof repair or further investigation. Furthermore, consider the surrounding environment when conducting your DIY roof assessment. Overhanging tree branches can cause significant damage to a roof, especially during storms. The constant rubbing of branches against the shingles can wear down the protective granules, making them more susceptible to water damage and impact.
Additionally, leaves and debris that collect on the roof can trap moisture, encouraging mold growth and decay. A proactive approach to tree trimming and roof cleaning is a vital aspect of preventative home maintenance. This ground-level roof inspection should not be a one-time event but rather a regular part of your home maintenance routine. By consistently monitoring your roof from the ground, you can identify potential problems early and take steps to address them before they escalate into costly repairs.
Finally, as part of your ground-level assessment, take detailed notes and photos of any areas of concern. This documentation will be invaluable when you move to the next phase of your DIY roof assessment, such as close-up roof inspection, and can also be helpful when consulting with a professional roofing contractor. Having a clear record of the condition of your roof can aid in communicating the issues and obtaining accurate quotes for any necessary roof repair. This information also serves as a valuable historical record, allowing you to track the progression of any damage over time. Remember, a thorough ground-level roof inspection is a vital first step in ensuring the long-term structural integrity of your home and a cornerstone of effective homeowner tips and roofing guide best practices.
Close-Up Roof Inspection
Accessing your roof for a closer inspection can provide invaluable insights into its structural integrity, but safety should always be your top priority. Before even considering stepping onto your roof, ensure you have a stable ladder placed on firm, level ground. Avoid placing the ladder against gutters or other unstable surfaces. A sturdy extension ladder that extends at least three feet beyond the roofline is ideal for safe access. Equip yourself with proper safety gear, including non-slip shoes with good traction, a safety harness, and a helmet.
Having a spotter on the ground is also highly recommended. Their assistance can range from holding the ladder steady to providing tools and alerting you to potential hazards. According to the National Safety Council, falls from ladders are a leading cause of preventable injuries, emphasizing the importance of these precautions. Once safely on the roof, begin your close-up inspection by carefully examining the flashing around chimneys, vents, and skylights. Flashing, typically made of metal, prevents water from seeping into these vulnerable areas.
Look for cracks, rust, or gaps in the flashing that could compromise its effectiveness. For example, cracked flashing around a chimney can lead to water damage in the attic and interior walls, a costly repair that could have been avoided with early detection. Next, inspect the shingles. Look for missing, curled, cracked, or loose shingles, all of which are signs of potential problems. Gently lift a few shingles to check for signs of moisture or rot beneath.
Dark stains, soft spots, or a musty odor can indicate underlying damage. Pay close attention to the sheathing, the wooden boards beneath the shingles. Sheathing provides a solid base for the shingles and protects the roof structure from the elements. If the sheathing is soft or shows signs of decay, it could signal a larger structural issue requiring professional attention. Documenting these findings with photos and detailed notes is crucial for tracking the progression of any issues and for sharing with roofing professionals if needed.
This detailed visual inspection, coupled with ground observation, provides a comprehensive understanding of your roof’s condition. Remember, while a DIY inspection empowers homeowners, recognizing your limitations is equally important. If you encounter extensive damage, significant sagging, or are unsure about any aspect of your roof’s condition, it’s always best to consult a qualified roofing contractor or structural engineer. Their expertise can help diagnose complex issues and recommend appropriate solutions, ensuring the long-term health and structural integrity of your roof. Regular DIY roof assessments, combined with professional guidance when necessary, are key to protecting your home investment and preventing minor issues from escalating into major expenses.
Understanding Roof Structure
Understanding the underlying structure of your roof is crucial for a comprehensive DIY roof structural integrity assessment. The framework, typically composed of rafters or trusses, acts as the skeleton, supporting the sheathing, shingles, and everything above. Rafters are sloped beams that run from the roof ridge to the exterior walls, while trusses are pre-fabricated, triangular structures engineered for specific load-bearing capacities. Identifying which system your roof uses is the first step. Look for visible beams in your attic; if you see triangular structures, you have a truss system.
If you see individual beams running the length of the roof, you have a rafter system. Knowing the difference is important, as modifications or repairs to one type should be approached differently than the other. For example, cutting or altering a truss without proper engineering consultation can significantly compromise the structural integrity of the entire roof. Always consult a professional if you’re unsure about working with trusses. Sheathing, typically made of plywood or oriented strand board (OSB), is attached to the rafters or trusses.
It provides a solid deck for the shingles and acts as a crucial barrier against weather elements. During your inspection, look for signs of sagging or unevenness in the sheathing, which could indicate structural problems with the rafters or trusses beneath. Pay close attention to areas around chimneys, vents, and skylights, as these are common points of vulnerability for water damage and structural weakening. Soft spots, discoloration, or visible signs of moisture on the sheathing warrant further investigation and potential professional roof repair.
Documenting these findings with photographs during your DIY roof assessment is invaluable for future reference and when consulting with roofing professionals. Beyond the primary components, understanding how different parts interact is key to a successful home inspection. For example, proper ventilation plays a crucial role in maintaining the structural integrity of your roof. Inadequate ventilation can lead to excessive heat and moisture buildup in the attic, which can damage the sheathing, rot the rafters or trusses, and shorten the lifespan of your shingles.
Look for proper soffit and ridge vents during your roof inspection to ensure adequate airflow. Blocked vents or signs of inadequate ventilation should be addressed promptly to prevent long-term roof damage. Regular home maintenance, including cleaning gutters and removing debris from the roof, can also contribute significantly to extending the life of your roof and preventing costly roof repair down the line. Incorporating these roofing tips into your homeowner tips repertoire will help safeguard your investment and ensure the long-term health of your roof.
Finally, consider the age of your roof. Asphalt shingles typically last 20-30 years, while other materials like tile or metal can last much longer. Knowing the age of your roof and the materials used can give you a better understanding of its expected lifespan and potential weaknesses. If your roof is nearing the end of its expected lifespan, it’s wise to consult a qualified roofing contractor for a professional assessment and to discuss options for replacement or roof repair. This proactive approach to home maintenance can prevent significant issues and potentially save you money in the long run by avoiding extensive damage and emergency repairs. Remember, a solid DIY roof assessment, coupled with timely professional consultation when needed, is a critical step in protecting your home and maintaining its value.
Identifying Causes of Damage
Water damage is a leading cause of roof problems, initiating a domino effect that can compromise structural integrity. Moisture intrusion, often stemming from damaged or missing shingles, faulty flashing, or clogged gutters, creates a breeding ground for rot and mold. Rot weakens the wooden components of your roof, including rafters, trusses, and sheathing, diminishing their ability to support the roof’s weight. Mold not only poses health risks but also accelerates the deterioration of organic materials, further weakening the structure.
A DIY roof assessment should carefully examine areas prone to water damage, such as valleys, around chimneys and vents, and near skylights. Look for signs of discoloration, staining, or soft spots in the wood. Early detection of water damage is crucial for preventing costly repairs and ensuring the long-term health of your roof. Age is another significant factor affecting roof integrity. Over time, exposure to the elements takes its toll on roofing materials. Shingles become brittle and lose their protective granules, making them more susceptible to cracking and wind damage.
Flashing can corrode, creating openings for water intrusion. The lifespan of a typical asphalt shingle roof is around 20-25 years, although this can vary depending on climate and maintenance. During a DIY roof inspection, pay close attention to the age and condition of your roofing materials. If your roof is nearing the end of its expected lifespan, consider consulting a roofing professional for a thorough evaluation. Severe weather events, such as storms with high winds and hail, can inflict significant damage on a roof.
Strong winds can tear off shingles, leaving the underlying sheathing exposed to the elements. Hail can puncture shingles and damage flashing, creating entry points for water. After a major storm, it’s essential to conduct a DIY roof assessment to identify any damage and take necessary steps for repair. Documenting the damage with photos is crucial for insurance claims. Inadequate ventilation can also contribute to roof problems. Proper attic ventilation allows for air circulation, preventing the buildup of heat and moisture.
Excessive heat can bake shingles from the underside, shortening their lifespan. Trapped moisture can lead to condensation, which can rot the wood and promote mold growth. During your DIY roof assessment, check for proper ventilation by inspecting soffit vents, ridge vents, and gable vents. Ensure these vents are clear of obstructions and functioning correctly. Finally, improper installation or substandard materials can compromise roof integrity from the outset. If a roof isn’t installed correctly, it may not be able to effectively shed water or withstand wind loads. Using low-quality materials can also lead to premature failure. When undertaking a DIY roof inspection, look for signs of poor workmanship, such as uneven shingle lines, improperly installed flashing, or inadequate nailing. If you suspect issues related to installation or materials, consult a qualified roofing contractor for a professional assessment and guidance on necessary repairs or replacements.
When to Seek Professional Help
While a DIY roof assessment empowers homeowners to understand their roof’s condition, recognizing the limitations of a non-professional inspection is crucial. Certain situations unequivocally demand the expertise of a qualified roofing contractor or structural engineer. Extensive damage, such as widespread missing shingles, large holes, or significant water damage, goes beyond the scope of a DIY repair and necessitates professional intervention. Attempting such repairs without the proper training and equipment can compromise the structural integrity of your roof and pose safety risks.
A professional roofer possesses the knowledge to accurately assess the extent of the damage, identify underlying causes, and implement effective, long-lasting repairs. For instance, what might appear as superficial shingle damage to an untrained eye could indicate deeper structural issues like damaged rafters or compromised sheathing, requiring specialized repair techniques. Significant sagging of the roof is another red flag that warrants professional attention. Sagging can indicate a weakened or failing roof structure, potentially caused by issues like excessive weight from snow accumulation, damaged rafters or trusses, or foundation problems.
A structural engineer can determine the root cause of the sagging and recommend the necessary corrective measures to ensure the stability and safety of your home. This might involve reinforcing existing structures, replacing damaged components, or addressing underlying foundation issues. Ignoring significant sagging can lead to further structural damage, posing a serious threat to your home’s integrity. Furthermore, if you encounter any unfamiliar signs of damage or are unsure about any aspect of your roof’s condition during your DIY roof assessment, seeking professional guidance is always the best course of action.
This includes situations where you identify potential signs of mold, mildew, or rot, or if you notice unusual cracking or deterioration of roofing materials. A professional roof inspection provides a comprehensive evaluation of your roof’s health, identifying potential problems that may not be readily apparent to an untrained eye. This thorough assessment ensures that any underlying issues are addressed promptly, preventing further damage and preserving the long-term structural integrity of your roof. Documenting your DIY findings with photos and notes will be invaluable when consulting with professionals, facilitating a more accurate diagnosis and targeted repair strategy.
Beyond visible damage, professionals also possess specialized tools and knowledge to assess less obvious issues, such as inadequate ventilation, which can lead to premature shingle deterioration and moisture buildup in the attic. They can identify signs of improper installation, such as incorrectly placed flashing around chimneys and vents, which can lead to leaks and water damage. Their expertise extends to evaluating the condition of underlying roof components, like the sheathing and underlayment, which are crucial for protecting your home from the elements.
By leveraging their professional training and experience, homeowners can gain a comprehensive understanding of their roof’s condition and ensure its long-term health and structural integrity. This proactive approach to roof maintenance ultimately protects your investment and provides peace of mind knowing that your home is safe and secure. Finally, professional roofing contractors and structural engineers can advise on preventative measures tailored to your specific roof type and climate. This may include recommendations for improved attic ventilation, regular gutter cleaning, and appropriate tree trimming to minimize the risk of future damage. Their insights are essential for maintaining your roof’s structural integrity and extending its lifespan. Regular professional inspections, coupled with diligent home maintenance, provide the best defense against costly roof repairs down the line. Remember, a sound roof is a cornerstone of a secure and well-maintained home, and investing in professional expertise when needed is a crucial step in protecting your investment.
Preventative Measures
Preventative maintenance is paramount in safeguarding your roof’s structural integrity and extending its lifespan, often proving more cost-effective than reactive roof repair. Regularly cleaning gutters, for instance, is not merely about aesthetics; it’s a crucial step in preventing water from backing up and seeping under the roofing materials, leading to rot and mold. Debris accumulation, such as leaves and twigs, can trap moisture, creating a breeding ground for these issues. Homeowners should aim to clean their gutters at least twice a year, or more frequently in areas with heavy tree cover, as a key component of their home maintenance routine.
This simple DIY roof assessment task can significantly reduce the risk of roof damage. Beyond gutter maintenance, removing overhanging branches is another essential preventative measure. Branches that rub against the roof can damage shingles, creating entry points for water. Furthermore, in storms, these branches can become hazards, potentially causing significant structural damage. A proactive approach includes trimming back any tree limbs that are within six to ten feet of the roofline. This not only protects the roof but also reduces the risk of debris accumulation on the roof itself.
Such homeowner tips contribute directly to the long-term health and stability of the roofing system, and are a crucial part of any comprehensive roofing guide. Another often overlooked aspect of preventative maintenance is ensuring proper roof ventilation. Inadequate ventilation can lead to moisture buildup in the attic, which, in turn, can cause rot and structural weakening. Proper ventilation allows air to circulate, helping to regulate temperature and humidity. This helps prevent the formation of condensation that can damage sheathing and rafters.
Homeowners should inspect their soffit and ridge vents regularly to ensure they are not blocked by insulation or debris. This aspect of a DIY roof assessment is crucial for maintaining the structural integrity of the roof and preventing costly roof repair down the line. Additionally, consider the impact of your home’s surroundings on your roof. Areas prone to heavy snowfall or extreme weather conditions require more diligent maintenance. Snow buildup can place significant stress on the roof structure, potentially leading to sagging or even collapse in severe cases.
Regular snow removal, when safe to do so, is crucial. Similarly, if your area experiences frequent high winds, regular roof inspection becomes even more important. Checking for loose or damaged shingles after a storm can prevent minor issues from escalating into major roof damage. These proactive measures are essential for any homeowner looking to protect their investment. Finally, while a DIY roof assessment is a valuable tool, it’s important to recognize its limitations. Preventative maintenance should be coupled with periodic professional roof inspections. A qualified roofing contractor can identify potential issues that may not be visible to the untrained eye, such as subtle structural weaknesses or early signs of wear. These professional assessments, combined with consistent homeowner maintenance, provide the most comprehensive approach to ensuring the long-term structural integrity and safety of your home’s roof. This combination of DIY and professional oversight offers the best protection against roof damage and ensures peace of mind.
Documenting Your Assessment
Documenting your DIY roof structural integrity assessment is a crucial step that goes beyond simply taking a few snapshots. A thorough record, combining detailed photos and descriptive notes, becomes an invaluable tool for both present and future roof maintenance, repairs, and even insurance claims. Think of it as creating a comprehensive health record for your roof, enabling you to track changes, identify developing issues, and communicate effectively with professionals. This meticulous documentation is essential for home improvement planning, DIY projects, and ensuring the long-term structural integrity of your roof.
Start by photographing each section of your roof systematically. Don’t just focus on obvious damage; capture the overall condition of shingles, flashing, vents, and chimneys. For instance, if you notice some granule loss on your shingles, a close-up photo along with a wider shot showing the affected area’s location can be very helpful. Annotate each photo with the date, time, and a brief description. This practice transforms simple images into powerful data points for tracking the progression of any issues.
Your notes should complement the visual record. Describe the condition of each area, noting any signs of damage, wear and tear, or potential weaknesses. For example, instead of just noting “damaged shingles,” specify the type of damage, such as “curling shingles on the south-facing slope.” These specific details are invaluable for accurate DIY roof assessments and home maintenance planning. Include measurements where relevant. If you spot a section of sagging roof, estimate the dimensions of the affected area.
This level of detail adds another layer of precision to your documentation, aiding in more accurate roofing tips and guidance for any future roof repair projects. Detailed documentation is also beneficial for insurance purposes. In the event of a storm or other incident that damages your roof, a comprehensive record of its pre-existing condition can significantly streamline the claims process. By providing clear evidence of the roof’s state before the incident, you can avoid disputes and ensure a smoother experience.
Organize your documentation in a clear and accessible format. Consider creating a dedicated folder on your computer or using a cloud-based storage system. This ensures your roof’s ‘health record’ is readily available when needed, whether for your own DIY projects, when consulting with roofing contractors, or for insurance purposes. Maintaining this detailed record empowers you as a homeowner to take proactive steps in preserving the structural integrity of your roof and protecting your home investment. Remember, consistent home maintenance and proactive measures are key to a long-lasting, healthy roof.
Safety First
“Safety First” should be the mantra for any DIY home improvement project, especially when it involves heights and the structural integrity of your roof. While this guide provides a starting point for assessing your roof’s condition, prioritizing personal safety is paramount. If you’re uncomfortable working at heights, have any physical limitations, or are unsure about any aspect of the inspection, it’s crucial to consult a qualified roofing professional. Attempting a DIY roof inspection beyond your skill level can lead to serious injuries or further damage to your roof.
Remember, a professional roofer has the experience, training, and equipment to safely and effectively assess your roof’s structural integrity. They can identify potential hazards you might overlook and provide expert recommendations for repairs or maintenance. For example, a professional can distinguish between cosmetic shingle damage and underlying structural issues with the roof decking or rafters, ensuring that the correct solutions are implemented. This expert assessment can save you money and prevent future problems. Before even considering a DIY roof inspection, assess your comfort level working at heights.
If the thought of climbing a ladder and traversing your roof induces anxiety or fear, it’s a clear sign to call a professional. Even experienced DIYers should exercise extreme caution. Ensure you have a stable, properly extended ladder and wear appropriate safety gear, including non-slip shoes with good traction and a safety harness. Never attempt a roof inspection in wet or windy conditions. These conditions drastically increase the risk of slips and falls. Keep in mind that seemingly minor roof damage can sometimes indicate significant underlying structural issues that require professional attention.
For instance, a small leak could be a symptom of damaged flashing around a chimney, potentially leading to extensive water damage if left unaddressed. A professional roofer can accurately diagnose the problem and implement the necessary repairs, preserving the structural integrity of your roof and preventing costly future repairs. Additionally, documenting the professional’s assessment can be invaluable for insurance claims and future home maintenance planning. Another critical aspect of safety involves understanding the structural components of your roof.
Rafters, trusses, and sheathing all play a vital role in supporting your roof and protecting your home. While a basic understanding of these components is helpful for a DIY assessment, a professional possesses in-depth knowledge of how these elements interact and how damage to one area can affect the overall structural integrity. For example, damaged sheathing can compromise the stability of your roof and make it more susceptible to wind damage, even if the shingles appear intact.
A professional can identify these hidden vulnerabilities and recommend the appropriate course of action. This expert analysis ensures that your roof maintains its structural integrity, safeguarding your home and providing peace of mind. Finally, remember that regular home maintenance, including roof inspections, is essential for protecting your investment and preventing costly repairs down the road. Whether you choose to conduct a DIY assessment or hire a professional, understanding the key aspects of roof structural integrity is crucial for every homeowner. By prioritizing safety, performing regular checks, and seeking professional help when needed, you can ensure the long-term health and safety of your roof and your home.”
Conclusion
Regular DIY roof assessments are not merely a weekend chore; they are a critical component of proactive home maintenance, safeguarding your investment against the elements and the ravages of time. By diligently performing these inspections, homeowners can catch minor issues early, preventing them from escalating into costly roof repairs or, worse, structural integrity problems. For example, a small leak around a chimney flashing, easily addressed with a bit of sealant, can quickly lead to significant water damage, requiring extensive roof repair if left unchecked.
This proactive approach not only protects your home but also provides peace of mind, knowing that you are actively maintaining one of your most valuable assets. Understanding the nuances of a DIY roof assessment is an empowering skill for any homeowner committed to long-term home maintenance and structural integrity. The economic benefits of a proactive approach to roof maintenance cannot be overstated. A comprehensive DIY roof assessment, done at least twice a year, can significantly extend the lifespan of your roof, potentially saving thousands of dollars in premature replacement costs.
According to industry data, the average cost of a full roof replacement can range from $5,000 to $20,000 or more, depending on the materials and size of the roof. By identifying and addressing issues like a few loose shingles or minor cracks early on, you’re not just performing home maintenance; you’re actively preserving the structural integrity of your home and avoiding major expenses. This proactive strategy aligns with sound financial planning and prudent homeownership. Moreover, insurance companies often favor homeowners who demonstrate a commitment to preventative maintenance, potentially leading to lower premiums or fewer claim disputes.
Beyond the financial aspects, regular roof inspection contributes to the overall safety and well-being of your household. Undetected roof damage can lead to structural weaknesses, which may compromise the integrity of your home’s frame. This can result in hazardous conditions, especially during severe weather events. For example, water damage can weaken roof sheathing, making it more susceptible to collapse under the weight of snow or heavy rain. By routinely conducting a DIY roof assessment, you are not only safeguarding your property but also ensuring the safety of your family.
This commitment to home maintenance should be a cornerstone of responsible homeownership. Utilizing a homeowner’s guide to conduct a thorough roof inspection empowers you to take control of your home’s structural integrity. Furthermore, performing a DIY roof assessment provides an invaluable opportunity to become intimately familiar with your home’s structure and its specific needs. This hands-on approach allows you to understand the different components of your roof, from the rafters and trusses to the sheathing and shingles, and how they work together to protect your home.
This knowledge empowers you to make informed decisions about roof repair or maintenance, and it allows you to better communicate with roofing contractors when professional help is required. This deeper understanding of your home’s infrastructure is a significant benefit of engaging in DIY home maintenance projects. The information gained from a detailed roof inspection will help you track the history of roof damage and repairs, which can be useful for future maintenance. Finally, remember that this homeowner’s guide is a starting point, not a replacement for professional expertise.
While a DIY roof assessment can identify many common issues, it’s crucial to recognize when to seek professional help. If you encounter significant sagging, extensive damage, or are uncomfortable working at heights, it is imperative to consult a qualified roofing contractor or structural engineer. A professional roof inspection can provide a detailed assessment of your roof’s condition and identify potential problems that may not be visible to the untrained eye. Combining your DIY efforts with professional advice ensures the long-term structural integrity and safety of your home. This balanced approach offers the best protection for your home and family.