Introduction: Assessing Roof Damage After a Storm – Safety First
After a severe storm, the urge to assess the damage to your property is natural, driven by the instinct to protect your investment and ensure the safety of your loved ones. However, before you rush outside to survey the aftermath, remember that safety is paramount. Your roof, potentially weakened by wind, hail, or water saturation, can pose significant risks, including the danger of collapse or falling debris. A hasty approach could lead to serious injury.
This comprehensive guide provides homeowners with a step-by-step roof inspection checklist for safely conducting a post-storm homeowner roof inspection, identifying common types of roof storm damage, documenting findings meticulously for insurance claims, and implementing temporary repair measures to prevent further issues. Knowing when to call a professional roofing contractor, rather than attempting a DIY fix beyond your capabilities, is also crucial for long-term safety and structural integrity. This article aims to equip you with the knowledge to protect your home and family effectively after the storm has passed, minimizing further damage and navigating the recovery process with confidence.
Before even considering a visual inspection, take a moment to consider the environmental factors. Assess whether it is safe to be outside at all. Is there still active lightning? Are there high winds that could cause further damage or make it unsafe to move around your property? According to the National Weather Service, more injuries occur after a storm has passed than during the actual event, often due to hazards like downed power lines and unstable structures.
Prioritize waiting until daylight to conduct your initial assessment; this will allow for better visibility and reduce the risk of tripping or falling over unseen debris. Remember, a thorough assessment is valuable, but your personal safety is invaluable. Even if you’re eager to spot hail damage roof or wind damage roof, resist the urge to climb onto the roof yourself immediately. Instead, begin with a thorough ground-level inspection using binoculars to get a closer view of hard-to-reach areas. This initial assessment can reveal significant damage, such as missing shingles, sagging sections, or displaced flashing, without putting you at unnecessary risk. Document these observations with photos or videos, as this information will be valuable when you eventually contact your insurance company or a roofing professional. Starting with a safe, ground-level inspection allows you to gather critical information while minimizing the potential for accidents.
Safety Precautions: Ground-Level Assessment Before You Climb
Before even considering climbing onto your roof, conduct a thorough ground-level inspection. Use binoculars to get a closer look at hard-to-reach areas. Pay attention to the following: Downed Power Lines: Stay away from any downed power lines and immediately contact your utility company. Debris: Be aware of fallen debris such as tree branches, shingles, or other materials that could pose a tripping hazard. Structural Instability: Look for signs of structural damage to the house itself, such as leaning walls or a sagging roofline.
If you notice any of these, do not attempt to inspect the roof yourself; call a professional immediately. Weather Conditions: Avoid inspecting your roof during rain, high winds, or icy conditions. Wait for a clear, dry day. This initial ground-level assessment is a critical first step in any homeowner roof inspection following a storm. It allows you to identify potential hazards and major damage from a safe vantage point, informing subsequent actions. Before even thinking about a roof storm damage assessment, meticulously scan the surrounding area for anything that could compromise your safety or provide clues about the roof’s condition.
Are there displaced gutters, indicating potential wind damage roof issues? Are there an unusual number of granules from asphalt shingles scattered around the foundation, suggesting possible hail damage roof? The answers to these questions will help prioritize areas for closer inspection and determine if a professional is needed. Beyond immediate dangers and easily visible damage, consider the less obvious indicators of potential problems. Look for pooling water around the foundation, which could suggest drainage issues exacerbated by roof damage.
Examine nearby trees for broken or weakened limbs that could pose a future threat to the roof. Note the direction and intensity of the storm; prevailing winds, for example, might indicate which side of the roof is most likely to have sustained wind damage roof. Use your roof inspection checklist to methodically record these observations, creating a comprehensive overview of the situation before you even consider climbing a ladder. This proactive approach minimizes risk and maximizes the effectiveness of your post-storm assessment.
Finally, remember that a thorough ground-level inspection is not just about identifying damage; it’s also about determining whether you, as a homeowner, are equipped to safely and effectively conduct a closer inspection. If you have any doubts about your ability to navigate the roof safely or if you spot signs of significant structural damage, it’s always best to err on the side of caution and call a qualified roofing professional. They possess the expertise and equipment to conduct a comprehensive assessment, identify hidden problems, and provide accurate estimates for necessary repairs. Prioritize safety above all else when considering a homeowner roof inspection.
Identifying Common Types of Storm Damage (Hail, Wind, Water)
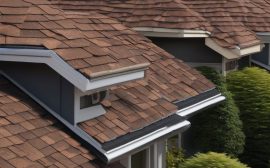
Storms can inflict various types of damage on your roof. Knowing what to look for is essential for a thorough homeowner roof inspection. Hail damage roof assessments should begin with identifying the size and density of the hail during the storm, as this directly correlates to the potential for damage. Hail can cause dents, cracks, and granule loss on asphalt shingles. Look for dark spots or circular patterns on the shingles. Hail damage can also affect metal roofs, leaving dents and dings.
These imperfections compromise the roof’s protective layer, accelerating weathering and potentially leading to leaks. A roof inspection checklist should always include a close examination of vulnerable areas like vents and flashing for hail-related impacts. Wind damage roof inspections require a keen eye for subtle indicators. High winds can lift, tear, or completely remove shingles. Check for missing shingles, curled or creased shingles, and exposed underlayment. Even seemingly minor wind damage can create entry points for water, leading to significant structural problems over time.
Furthermore, wind can damage flashing around chimneys, vents, and skylights, compromising their ability to seal these critical areas. Documenting the direction and force of the wind during the storm can aid in determining the extent and pattern of potential wind-related roof storm damage. Water damage, often a consequence of both hail and wind damage, presents itself in various forms. Water can seep into the roof through damaged shingles or flashing, leading to leaks and rot.
Look for water stains on ceilings, walls, or in the attic. Mold growth can also be a sign of water damage, indicating a persistent moisture problem. Beyond visible stains, homeowners should also be aware of musty odors, which can signal hidden water intrusion within the roof structure. Addressing water damage promptly is crucial to prevent costly repairs and maintain the structural integrity of the home. Regularly scheduled roof inspections, especially after significant weather events, are a critical component of home maintenance.
Documenting Damage for Insurance Claims (Photos, Videos, Notes)
Documenting roof storm damage is not merely a formality; it’s the cornerstone of a successful insurance claim. A meticulous record provides irrefutable evidence of the storm’s impact, substantiating the need for repairs or replacement. Begin by capturing comprehensive photos. High-resolution images are essential, showcasing both the overall extent of the damage and intricate details. Wide-angle shots establish the context, illustrating the affected areas of the roof in relation to the entire house. Complement these with close-up shots that highlight specific issues like cracked or missing shingles, fractured flashing around chimneys and vents, and the telltale signs of hail damage roof, such as dents and granule loss.
Remember to photograph any displaced or damaged components found in the yard, as these corroborate the force and direction of the storm. Video documentation offers a dynamic perspective, allowing you to narrate the damage in real-time. As you walk the perimeter of your property and, if safe and possible, the roof itself, describe what you observe. Point out areas of concern, emphasizing the type of damage and its potential consequences. For example, if you notice water stains on the interior ceilings, document their location and proximity to potential roof leaks.
Similarly, capture any signs of wind damage roof, such as lifted shingles or displaced ridge caps. A well-narrated video provides context and clarity, helping the insurance adjuster understand the full scope of the problem. When conducting a homeowner roof inspection, videos can show areas difficult to photograph. Detailed notes are equally crucial. Your notes should include the date and time of the storm, its duration, and the specific weather conditions (hail size, wind speed, rainfall intensity).
Systematically document each area of damage, noting the type, severity, and location. For example, ‘South-facing slope: 15 shingles with significant granule loss, indicative of hail damage roof.’ Also, meticulously record any pre-existing conditions on your roof. This prevents disputes with the insurance company by clearly distinguishing between old wear and tear and new storm-related damage. Use a roof inspection checklist to ensure all areas are covered. Finally, if it is safe to do so, collecting samples of damaged materials, such as cracked shingles or pieces of torn flashing, can provide tangible evidence to support your claim and help the adjuster assess the quality of the original materials and the extent of the damage.
Temporary Repair Measures to Prevent Further Damage
While awaiting professional intervention for permanent repairs, homeowners must enact temporary solutions to mitigate further roof storm damage. These immediate actions, guided by a homeowner roof inspection, are critical in preventing minor issues from escalating into significant structural problems. Addressing these concerns promptly not only safeguards the home’s integrity but also strengthens your insurance claim by demonstrating proactive damage control. Remember to prioritize safety during all temporary repair efforts; if conditions are unsafe, such as ongoing storm activity or unstable roof conditions, defer these measures to qualified professionals.
Tarping is the most effective first-line defense. Secure a heavy-duty, waterproof tarp over any compromised areas to prevent further water intrusion. When addressing hail damage roof scenarios, ensure the tarp extends beyond the damaged section to capture any displaced granules or weakened areas prone to leaks. For wind damage roof situations, carefully secure the tarp’s edges with roofing nails or staples, spacing them closely to withstand potential wind gusts. Consider using furring strips along the edges for added security and to prevent the tarp from flapping, which can exacerbate damage.
Remember to document the tarping process with photos for your insurance claim. Inside the home, strategic bucket placement is essential. Position buckets or containers to collect any active leaks, protecting furniture, flooring, and personal belongings. Consider using plastic sheeting to create a temporary drainage system, directing water away from walls and sensitive areas. Regularly empty the buckets to prevent overflow and potential secondary damage. Debris removal is another crucial step. Carefully clear any loose shingles, branches, or other debris from the roof surface. However, avoid walking on visibly damaged areas to prevent further structural weakening. Use a long-handled tool to reach debris from a safe vantage point, and always wear appropriate safety gear, including gloves and eye protection. Document all debris removed, as this can provide additional evidence of the storm’s impact during your roof inspection checklist process.
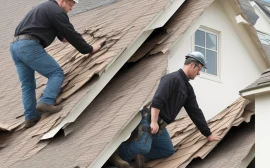
When to Call a Professional Roofing Contractor
Climbing onto a roof can be dangerous, especially after a storm. If you are not comfortable with heights, or if you notice any signs of structural damage, it is best to call a professional roofing contractor. Here’s how to find the right one: Research Local Professionals: Search online directories, check with your insurance company, and ask for recommendations from friends and neighbors. Verify Licensing and Insurance: Ensure the contractor is licensed and insured to protect yourself from liability.
Read Customer Reviews: Check online reviews and ratings to get an idea of the contractor’s reputation and quality of work. Request Multiple Estimates: Obtain estimates from several contractors to compare pricing and services. Check References: Ask for references from past clients and contact them to inquire about their experience with the contractor. Beyond the basics, delve into the contractor’s specialization. Roof storm damage repair requires a specific skillset, distinct from general roofing. Look for contractors with proven experience handling hail damage roof and wind damage roof situations.
Ask about their familiarity with various roofing materials common in your area – asphalt shingles, tile, metal – and their respective vulnerabilities to storm damage. A contractor well-versed in homeowner roof inspection best practices will be able to provide a detailed assessment and explain the necessary repairs clearly, aligning with your roof inspection checklist. Furthermore, consider the contractor’s approach to documentation. A reputable professional understands the importance of thorough record-keeping for insurance claims. They should be willing to provide detailed estimates, take before-and-after photos, and document the extent of the damage, including evidence of wind uplift or hail impacts.
Inquire about their experience working with insurance companies; some contractors even specialize in navigating the claims process, acting as an advocate for the homeowner. This expertise can be invaluable in ensuring a fair settlement and a smooth repair process following roof storm damage. Finally, be wary of contractors who pressure you into signing a contract immediately or demand upfront payment in full. A trustworthy contractor will provide a clear, written contract outlining the scope of work, materials to be used, payment schedule, and warranty information. Don’t hesitate to consult with a legal professional before signing any agreement, especially if the damage is extensive or the cost of repairs is significant. Prioritize a contractor who prioritizes open communication, transparency, and a commitment to quality workmanship, ensuring your roof is restored to its pre-storm condition and protects your home for years to come.
Printable Roof Inspection Checklist for Homeowners
Here’s a comprehensive, printable roof inspection checklist to guide you through your post-storm homeowner roof inspection, ensuring a systematic approach to assessing potential roof storm damage. Remember, this checklist is a starting point; always prioritize safety and consult with professionals when needed. **Safety First:**
[ ] Assess ground-level safety (downed power lines – contact utility company immediately; debris – watch for nails and sharp objects). According to the Electrical Safety Foundation International (ESFI), downed power lines should always be treated as live. [ ] Inspect only during clear, dry weather (avoid inspections during or immediately after rain, snow, or high winds). [ ] Wear appropriate safety gear (sturdy, non-slip shoes are crucial; gloves to protect your hands from sharp debris; consider eye protection).
**Ground-Level Inspection:**
[ ] Check for missing or damaged shingles (note the location and extent of the damage). [ ] Inspect flashing around chimneys, vents, and skylights (look for gaps, cracks, or rust). Flashing is critical for preventing water intrusion; damaged flashing is a common source of leaks. [ ] Look for signs of sagging or structural damage (this could indicate serious problems and warrants immediate professional attention). [ ] Note any debris or fallen materials (document the type and quantity of debris, as this can provide clues about the storm’s intensity and the source of damage).
**Roof Inspection (If Safe to Climb):**
[ ] Examine shingles for hail damage (dents, cracks, granule loss – especially on asphalt shingles; look for circular patterns). The Insurance Institute for Business & Home Safety (IBHS) recommends a close inspection for hail impacts, which can weaken shingles over time. [ ] Check for wind damage (lifted, torn, or missing shingles; pay close attention to the edges of the roof). Wind damage roof issues often start small but can quickly escalate during subsequent storms. [ ] Inspect for water damage (stains, mold, or discoloration on the underside of shingles or roof decking). [ ] Assess the condition of gutters and downspouts (check for dents, clogs, and proper drainage).
Damaged gutters can lead to water pooling and potential roof leaks. [ ] Check attic for leaks and water stains (look for water stains on the underside of the roof decking and insulation). **Documentation:**
[ ] Take photos and videos of all damage (capture both close-up shots and wide-angle views for context). High-resolution images are essential for insurance claims. [ ] Keep detailed notes of your findings (include the date, time, location, and description of the damage). [ ] Collect samples of damaged materials (if safe and feasible, collect a few damaged shingles or pieces of flashing for the insurance adjuster).
**Temporary Repairs:**
[ ] Cover damaged areas with a tarp (secure the tarp properly to prevent it from blowing away; use nails or staples and consider using furring strips for added security). A properly installed tarp is crucial to prevent further water damage. [ ] Place buckets under leaks inside the home (empty the buckets regularly to prevent overflow). [ ] Remove loose debris from the roof (only if it can be done safely from the ground or with proper safety equipment).
**Professional Assistance:**
[ ] Contact a licensed and insured roofing contractor (verify their credentials and insurance coverage). [ ] Obtain multiple estimates (compare the estimates carefully and ask for detailed explanations of the proposed repairs). [ ] Check references and reviews (look for online reviews and ask the contractor for references from past clients). Don’t hesitate to ask for proof of previous similar roof storm damage repairs. Remember to check with the Better Business Bureau for any complaints against the contractor. A reputable contractor will also be able to provide a detailed roof inspection checklist specific to your roof type and local weather patterns.
Visual Aids: Illustrations and Photos of Common Roof Damage
Visual aids are invaluable tools for homeowners attempting to understand the often-subtle nuances of roof storm damage. A picture truly is worth a thousand words when discerning between normal wear and tear and damage inflicted by severe weather. Online searches are a great starting point, but be sure to refine your queries to focus on your specific roofing material (asphalt, slate, tile, metal) for the most relevant examples. Supplementing your research with manufacturer-provided guides or resources from reputable insurance providers will further enhance your ability to conduct a thorough homeowner roof inspection.
For example, accurately identifying hail damage roof can be tricky. Look for before-and-after comparisons showing the granule loss on asphalt shingles; this often appears as small, dark, bruise-like spots. For metal roofs, focus on identifying dents that aren’t simply superficial but have creased the metal. Similarly, differentiating between wind damage roof and age-related deterioration requires careful observation. Visuals depicting lifted shingles, creased or torn materials, and displaced flashing are essential for accurate assessment. Remember that seemingly minor damage can quickly escalate, leading to leaks and more extensive problems.
Beyond still images, consider searching for videos demonstrating proper roof inspection techniques and showcasing examples of various types of storm damage. Many professional roofing contractors and home inspection services offer video tutorials that can provide a clearer understanding of what to look for. Furthermore, some insurance companies provide interactive tools that allow you to compare images of undamaged roofs with those exhibiting common storm-related issues, offering a valuable resource when completing your roof inspection checklist. These visual aids empower homeowners to document damage effectively and communicate their findings clearly when filing insurance claims.
Beware of Scams: Choosing a Reputable Roofing Contractor
After a storm, homeowners are often targeted by unscrupulous contractors looking to capitalize on the urgent need for repairs. Be exceedingly wary of roofing contractors who aggressively solicit business, especially those who appear immediately after a significant weather event. These individuals may use high-pressure sales tactics or offer suspiciously low prices that seem too good to be true. Such behavior is a significant red flag, potentially indicating a scam designed to cut corners, use substandard materials, or disappear with your money before completing the work.
Always approach unsolicited offers with extreme caution and prioritize thorough vetting over immediate solutions when dealing with roof storm damage. Protect yourself by meticulously verifying the contractor’s credentials before signing any agreements. Confirm that they are properly licensed and insured to operate in your area; a legitimate roofing contractor will readily provide this information. Check their insurance coverage, specifically liability and workers’ compensation, to protect yourself from potential liabilities if accidents occur on your property during the repair process.
Furthermore, take the time to read customer reviews and check their rating with the Better Business Bureau. A reputable contractor will have a solid track record of satisfied customers and a commitment to ethical business practices when handling hail damage roof or wind damage roof. Before any work commences, insist on a written contract that comprehensively outlines the scope of work to be performed, the specific materials to be used (including brands and warranties), the project timeline, and a detailed breakdown of payment terms.
Scrutinize the contract carefully, paying close attention to clauses regarding change orders, dispute resolution, and cancellation policies. A homeowner roof inspection, even if conducted personally using a roof inspection checklist, cannot replace the expertise of a qualified professional, especially when assessing complex damage. Finally, avoid paying the entire amount upfront; a reasonable down payment is standard, but the majority of the payment should be contingent upon satisfactory completion of the project. This protects you from potential fraud and ensures the contractor remains motivated to complete the job to your satisfaction.
Conclusion: Protecting Your Home Through Vigilance and Professional Help
Conducting a post-storm roof inspection is a crucial step in safeguarding your home and family’s well-being. By diligently following this step-by-step guide and using a comprehensive roof inspection checklist, you empower yourself to safely assess potential roof storm damage, meticulously document your findings for insurance claims, and implement temporary protective measures to avert further complications. Remember, personal safety remains paramount; when uncertainty prevails, consulting a qualified roofing contractor is invariably the wisest course of action.
Their trained eye can discern subtle yet significant structural weaknesses that might escape a homeowner roof inspection. The aftermath of a severe weather event presents unique challenges to home maintenance. Addressing hail damage roof or wind damage roof issues promptly is essential to prevent escalating problems like water intrusion, which can lead to costly repairs and compromise the structural integrity of your home. Regular homeowner roof inspection, ideally twice a year and after any significant weather event, can identify early warning signs of deterioration, such as cracked or missing shingles, damaged flashing, or granule loss.
Addressing these minor issues proactively can significantly extend the lifespan of your roof and prevent major storm damage. Beyond individual inspections, establishing a relationship with a reputable roofing contractor is an invaluable investment. A professional assessment provides a comprehensive evaluation, including areas often overlooked by homeowners, such as attic ventilation and chimney flashing. Furthermore, they possess the expertise to determine the extent of any damage and recommend the most appropriate repair solutions, ensuring your roof continues to provide reliable protection for years to come. Remember to verify credentials, check insurance, and obtain multiple quotes before committing to any repairs, safeguarding yourself from potential scams and ensuring quality workmanship.