Introduction: After the Fire – Securing Your Home with a Fire-Resistant Roof
The acrid smell of smoke still hangs in the air, a stark reminder of the wildfire that recently threatened your home. While the immediate danger has passed, the aftermath presents a new challenge: assessing and repairing the damage, especially to your roof – your home’s first line of defense. For homeowners in wildfire-prone areas, a fire-resistant roof isn’t just a desirable feature; it’s a necessity. This guide provides a step-by-step approach to evaluating roof damage, selecting the right materials, and safely undertaking DIY repairs or a full replacement, empowering you to protect your family and property.
Beyond the immediate repair, consider this an opportunity to upgrade your roof’s fire resistance. The increasing frequency and intensity of wildfires demand a proactive approach to home safety. This means moving beyond simply patching up damage and instead investing in fire-resistant roofing materials and proper installation techniques. Think of it as hardening your home against future threats, potentially saving you from significant losses and emotional distress. Investing in Class A roofing isn’t just about meeting building codes; it’s about peace of mind.
Navigating the complexities of roof repair and wildfire protection can feel overwhelming, especially when dealing with insurance claims. Understanding the nuances of your policy, documenting the damage meticulously, and obtaining accurate estimates are crucial steps in maximizing your coverage. Furthermore, deciding between DIY roofing repairs and hiring a professional roofing contractor requires careful consideration of your skills, the extent of the damage, and local building codes. This guide aims to equip you with the knowledge and resources to make informed decisions, ensuring your home is not only structurally sound but also resilient against future wildfires. Explore options like metal roofing or tile roofing for enhanced wildfire protection.
Assessing Roof Damage After a Wildfire: A Step-by-Step Inspection
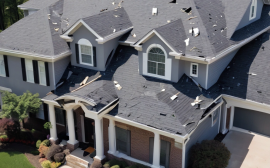
The first crucial step after a wildfire event is a meticulous roof inspection. This process goes beyond a casual glance; it’s a comprehensive assessment to determine the extent of the damage and inform subsequent actions. **Safety First:** Before even considering climbing onto your roof, prioritize safety above all else. Ensure the structure is sound. If there’s any doubt about its integrity, contact a professional roofing contractor or structural engineer. Use a sturdy, properly positioned ladder, and wear essential safety gear, including work gloves, certified eye protection, and a secure safety harness tethered to a reliable anchor point.
During your roof inspection, be vigilant for these key indicators of fire-related damage. Look for: Charred or Burned Areas, which are obvious signs of direct flame impingement and indicate the intensity of the fire exposure. Cracked or Missing Shingles/Tiles, which signify heat damage and a compromised ability to protect your home from the elements. Deformed Materials, where warping, bubbling, or melting suggests extreme heat exposure that has altered the material’s structural properties. Smoke Damage, characterized by soot and residue accumulation, can degrade roofing materials over time and affect their long-term performance.
Finally, be aware of Water Damage, which can result from firefighting efforts and lead to hidden problems like mold growth and structural weakening. Documenting all observed damage meticulously is crucial for insurance claims and accurate roof repair planning. Take high-resolution photos and videos, capturing both close-up details and wide-angle perspectives. Supplement these visuals with detailed written notes describing the type, location, and severity of the damage. Note the specific materials affected, such as asphalt shingles, tile roofing, or metal roofing components.
This comprehensive documentation provides essential evidence for your insurance company and helps roofing contractors develop accurate repair estimates. Remember that even seemingly minor damage can compromise the long-term performance of your roof, so a thorough roof inspection is an investment in your home’s safety and resilience. Consider professional roof inspection services for an expert assessment, especially if you are uncomfortable with heights or unsure about identifying subtle damage signs. This detailed assessment will help determine the extent of roof repair or roof replacement needed and inform your decisions regarding fire-resistant roofing materials and wildfire protection strategies.
Selecting Fire-Resistant Roofing Materials (Class A Rated): A Cost Analysis
Choosing the right roofing materials is crucial for fire resistance. Look for Class A rated materials, the highest fire-resistance rating, meaning they can withstand severe fire exposure. This rating signifies that the material has undergone rigorous testing and meets specific standards for flame spread, flame penetration, and intermittent flame resistance. Selecting a Class A fire-resistant roofing material is a critical step in wildfire protection, offering a significant advantage in safeguarding your home. Here’s a comparison of common options:
Metal Roofing (Steel, Aluminum, Copper): Excellent fire resistance, durable, long-lasting, and reflective, reducing heat absorption. Metal roofs are virtually non-combustible, providing exceptional protection against flying embers, a common cause of wildfire-related roof ignitions. Their reflective properties also help reduce cooling costs during hot summer months, adding to their long-term value. However, installation can be more complex, potentially requiring specialized tools and expertise, which impacts the overall cost. Cost: $150-$900+ per 100 sq ft installed. Tile Roofing (Clay, Concrete): Non-combustible, durable, and aesthetically pleasing.
Tile roofs offer inherent fire resistance due to their composition. Clay and concrete tiles are heavy and can withstand high temperatures without igniting or melting. Their weight, however, necessitates a structurally sound roof capable of bearing the load. In regions prone to earthquakes, this added weight should be carefully considered in the structural design. Tile roofing provides excellent longevity and can enhance a home’s curb appeal. Cost: $300-$700+ per 100 sq ft installed. Asphalt Shingles (Class A Rated): More affordable than metal or tile, but must specifically be Class A rated.
Not all asphalt shingles are created equal when it comes to fire resistance. It’s essential to verify that the shingles you select have a Class A rating from a recognized testing laboratory. Consider fiberglass-based shingles for better fire resistance compared to organic-mat shingles, as fiberglass is less prone to combustion. While asphalt shingles offer a more budget-friendly option, their lifespan may be shorter compared to metal or tile, requiring more frequent roof repair or eventual roof replacement.
Cost: $120-$400+ per 100 sq ft installed. Slate Roofing: A naturally fire-resistant and very durable option. Slate is a premium roofing material known for its exceptional fire resistance and longevity, often lasting over a century. Its natural stone composition makes it impervious to fire. However, slate is also one of the most expensive roofing options, and its significant weight requires a robust roof structure. The installation process demands specialized skills, typically performed by experienced roofing contractors specializing in slate work.
While the initial investment is substantial, the long-term durability and fire protection benefits make it a worthwhile consideration for homeowners seeking ultimate protection. Cost: $800-$1800+ per 100 sq ft installed. When evaluating roofing materials for wildfire protection, also consider the roof’s underlayment. Using a fire-resistant underlayment beneath your chosen roofing material adds an extra layer of protection. Synthetic underlayments generally offer better fire resistance than traditional felt paper. Furthermore, ensure proper roof ventilation to prevent the buildup of heat, which can exacerbate fire risks.
Regular roof inspection is crucial to identify and address any potential vulnerabilities, such as damaged or missing shingles, which can compromise the roof’s fire resistance. Remember to consult with your insurance provider to understand how your choice of roofing material may affect your insurance premiums and coverage for wildfire-related damage. Consider your budget, aesthetic preferences, and local building codes when making your selection. Ensure the chosen material is compatible with your roof’s structure and climate.
For instance, in areas with heavy snowfall, the weight-bearing capacity of the roof should be a primary concern, potentially favoring lighter materials like metal roofing. In coastal regions, consider materials that are resistant to salt air corrosion. Prioritizing fire-resistant roofing is a wise investment in home safety, and understanding the nuances of each material will help you make an informed decision. Always consult with a qualified roofing contractor for professional advice and installation to ensure optimal performance and longevity.
Local Building Code Considerations for Wildfire Zones: Permits and Regulations
Before starting any DIY work, checking your local building codes and obtaining the necessary permits is paramount, especially in wildfire-prone areas. These regions often have stringent, specific requirements for roofing materials and installation methods designed to enhance wildfire protection. Contacting your local building department or planning office is a critical first step; they can provide detailed information on acceptable fire-resistant roofing options, including Class A roofing materials like metal roofing and tile roofing, and proper installation techniques.
Ignoring these regulations can lead to significant setbacks, including fines, mandatory rework, and potential denial of insurance claims should a future fire damage your non-compliant roof. Furthermore, building codes frequently dictate specific requirements for roof inspection and maintenance in wildfire zones. For example, some jurisdictions mandate annual roof inspections to identify and address vulnerabilities before they escalate. These inspections often focus on the condition of asphalt shingles, the integrity of flashing around chimneys and vents, and the presence of debris accumulation, all of which can impact a roof’s fire resistance.
Understanding these preventative measures is crucial for both DIY roofing enthusiasts and homeowners considering professional roof repair or roof replacement. Adherence to these codes not only ensures the safety of your home but also demonstrates a commitment to community-wide wildfire mitigation efforts. Consider the case of Paradise, California, where the devastating 2018 Camp Fire underscored the critical importance of building codes and fire-resistant construction. Following the fire, stricter regulations were implemented, emphasizing the use of Class A rated materials and enhanced fire safety measures for all new and renovated structures. This real-world example highlights the proactive role building codes play in minimizing wildfire damage and protecting communities. Therefore, whether you’re undertaking a minor roof repair or a complete roof replacement, prioritizing compliance with local building codes is an investment in the long-term safety and resilience of your home and community. Ensure all documentation, including material specifications and installation procedures, is readily available for insurance claims purposes should the need arise.
Performing Safe DIY Roof Repairs: A Step-by-Step Guide
Minor roof repairs, particularly after a wildfire, can often be handled DIY, offering a sense of control and immediate action. However, safety must be paramount. Before undertaking any DIY roofing project, meticulously assess the extent of the damage. If the fire has compromised the structural integrity of the roof, or if you’re uncomfortable working at heights, it’s best to call in a professional. Assuming the damage is limited to a few asphalt shingles or tiles, and you’re confident in your abilities, proceed cautiously.
Always wear appropriate safety gear, including a harness, sturdy boots, and eye protection. Remember, even seemingly small roof repair tasks can present significant risks if not approached with proper precautions and respect for height safety. This is especially true in wildfire-prone areas, where weakened structures may be less stable than they appear. Understanding your limitations is a crucial aspect of DIY roofing. Here’s a guide for replacing damaged shingles or tiles, focusing on fire-resistant roofing maintenance.
First, gather your tools and materials: roofing nails (ensure they are compatible with your chosen roofing material), a hammer or nail gun, a pry bar for removing old shingles, a utility knife for trimming new ones, new fire-resistant roofing materials (matching your existing roof as closely as possible), and roofing sealant. When selecting replacement asphalt shingles, consider those with a Class A fire rating for enhanced wildfire protection. For tile roofing, ensure the replacements are of similar material and thickness to maintain consistent fire resistance.
Metal roofing, while offering excellent fire protection, typically requires specialized tools and expertise for repair, making it less suitable for DIY in most cases. Prioritize materials designed to bolster your home’s wildfire resilience. Removing damaged shingles or tiles requires care to avoid further damage. Carefully pry up the damaged shingle, working from the bottom upwards, removing nails with a pry bar. Be mindful of any underlying underlayment, and avoid tearing it if possible. If the underlayment is damaged, patch it with appropriate roofing felt or a self-adhering membrane.
Next, prepare the surface by cleaning the exposed area with a brush to remove any debris, ash, or loose granules. Ensure the area is dry before proceeding, as moisture can compromise the adhesion of the new shingle. Then, install the new shingle, sliding it into place and aligning it with the surrounding shingles. Nail it securely using roofing nails, ensuring the nails penetrate the shingle and the underlying roof deck. Finally, seal the edges of the new shingle with roofing sealant to prevent water intrusion, a critical step in maintaining the integrity of your roof and preventing future problems.
Regular roof inspection is crucial for early detection of issues. While these DIY roof repair steps can address minor damage and contribute to wildfire protection, it’s important to recognize when a larger roof replacement is necessary. If the damage is extensive, affecting a significant portion of your roof, or if you suspect structural damage, it’s time to consult with a professional roofing contractor. A full roof replacement is a complex undertaking that requires specialized skills and equipment.
Furthermore, navigating insurance claims related to wildfire damage can be challenging. A professional contractor can assist with documenting the damage, providing accurate estimates, and working with your insurance company to ensure you receive fair compensation. Remember to check your local building codes and obtain necessary permits before starting any major roof repair or replacement project. Choosing Class A roofing materials is a key component of wildfire preparedness and can significantly impact your insurance premiums. Always prioritize safety and consult with experts when in doubt.
DIY Roof Replacement: A Complex Task Requiring Professional Expertise
A full roof replacement is a significant undertaking best left to professionals, but understanding the process is helpful. It typically involves: 1. **Tear-Off:** Removing the existing roofing materials down to the roof deck. 2. **Inspection:** Inspecting the roof deck for damage and making necessary repairs. 3. **Underlayment:** Installing a waterproof underlayment to protect the roof deck. 4. **Installation:** Installing the new fire-resistant roofing materials according to manufacturer’s instructions. 5. **Flashing:** Installing or replacing flashing around chimneys, vents, and other roof penetrations.
This process requires specialized tools, expertise, and adherence to safety regulations. While DIY roofing might seem tempting to save costs, a complete roof replacement presents complexities that often exceed the capabilities of the average homeowner, especially when striving for wildfire protection. Consider the sheer scale of the project: a typical roof requires handling hundreds, even thousands, of pounds of materials, demanding physical endurance and proper lifting techniques to prevent injury. Furthermore, ensuring a weathertight seal and proper installation crucial for qualifying for insurance claims and maintaining your home’s structural integrity, necessitates a level of precision and experience that only seasoned professionals possess.
Incorrect installation can lead to leaks, premature material failure, and voided warranties, ultimately costing more in the long run. The selection of fire-resistant roofing materials is another critical aspect where professional guidance is invaluable. While Class A roofing materials like metal roofing or tile roofing offer superior protection, their installation differs significantly from traditional asphalt shingles. Metal roofing, for example, requires specialized cutting and fastening techniques to accommodate thermal expansion and contraction, preventing buckling and ensuring a long-lasting, fire-resistant barrier.
Tile roofing, on the other hand, demands a reinforced roof deck to support its considerable weight. A professional roofing contractor can assess your home’s structural capacity and recommend the most suitable fire-resistant roofing solution, factoring in local building codes and aesthetic preferences. Finally, navigating the intricacies of insurance claims related to roof replacement often necessitates expert assistance. Documenting pre-existing conditions, accurately assessing damage extent, and negotiating with insurance adjusters requires a thorough understanding of roofing systems and insurance policies. A professional roofing contractor can provide detailed estimates, photographic evidence, and expert testimony to support your claim, ensuring you receive fair compensation for the necessary repairs or roof replacement. Engaging a contractor experienced in handling insurance claims can streamline the process and alleviate the stress associated with securing adequate coverage for your wildfire protection needs. Remember, proper roof inspection after a fire is critical for a successful claim.
Navigating the Insurance Claim Process: Maximizing Your Coverage
Dealing with insurance claims after wildfire damage can feel like navigating a labyrinth, but understanding the process empowers you to secure the coverage you deserve. Here’s a detailed breakdown to guide you: 1. Notify Your Insurance Company: Report the damage as soon as possible. Time is of the essence, as policies often have specific deadlines for filing claims. Provide initial details such as the date and cause of the damage (wildfire), the type of damage sustained (e.g., fire-resistant roofing damage, smoke damage), and your policy number.
Document the date and time of your call, and the name of the representative you spoke with. This record-keeping can prove invaluable later in the process. 2. Document the Damage: Comprehensive documentation is crucial. Take abundant photos and videos of all affected areas, focusing on the roof and any damage to fire-resistant roofing materials like metal roofing, tile roofing, or even asphalt shingles if they’ve been compromised. Include close-ups of damaged areas as well as wide shots showing the overall extent of the damage.
Detailed descriptions accompanying the visuals will further strengthen your claim. For example, note the number of missing or burned shingles, the presence of smoke stains, or any structural damage to the roof deck. 3. Obtain Estimates: Secure multiple estimates from licensed roofing contractors specializing in fire-resistant roof repair and roof replacement. These estimates should provide a detailed breakdown of the necessary repairs or replacement, including the cost of materials (specifying Class A roofing materials where applicable) and labor.
Having several estimates gives you leverage during negotiations with the insurance adjuster and ensures you’re receiving fair pricing. 4. Meet with the Adjuster: Be present, if possible, when the insurance adjuster inspects the damage. Point out all areas of concern, referring to your documented evidence. Don’t hesitate to ask questions and seek clarification on any points you don’t understand. The adjuster represents the insurance company, but it’s your responsibility to advocate for your claim and ensure all damage is properly assessed. 5.
Review the Settlement Offer: Carefully scrutinize the settlement offer, comparing it to your estimates and policy coverage. Ensure that the offer adequately covers the cost of repairs or replacement, including any necessary upgrades to meet current building codes for wildfire zones. If the offer seems insufficient, don’t hesitate to negotiate. Back up your counter-offer with supporting documentation, such as additional estimates or expert opinions. Understand your policy’s coverage and deductibles. Many homeowners are unaware of the nuances within their insurance policies, particularly regarding exclusions or limitations related to wildfire damage.
Familiarize yourself with the terms and conditions of your policy, paying close attention to any deductibles, coverage limits, and exclusions that may apply. For example, some policies may have separate deductibles for wildfire damage or may exclude coverage for certain types of roofing materials. Being informed empowers you to advocate effectively for your claim and maximize your coverage. Be prepared to advocate for your claim. The insurance claim process can be complex and time-consuming, requiring persistence and attention to detail.
Don’t be afraid to challenge the insurance company’s decisions or seek assistance from a public adjuster or attorney if you believe your claim is being unfairly denied or undervalued. Remember, you have the right to a fair and impartial assessment of your damage and to receive the coverage you’re entitled to under your policy. Document all communication with the insurance company, including dates, times, and the names of individuals you spoke with. This record-keeping can be invaluable if disputes arise.
When to Hire a Professional Roofing Contractor Instead of DIY: Assessing Your Limits
While DIY repairs can save money, there are times when hiring a professional is essential. Extensive damage, particularly if it’s widespread or compromises the roof’s structural integrity, necessitates expert intervention. Attempting to DIY repairs on a significantly damaged roof can lead to further structural issues, water damage, and potentially dangerous collapses. Similarly, if you’re not comfortable working at heights or lack roofing experience, it’s best to call a professional. Falls from roofs are a leading cause of construction-related injuries, and without proper training and safety equipment, the risks are simply too high.
Complex roof designs, characterized by multiple slopes, chimneys, dormers, or skylights, also demand the specialized skills of a professional roofing contractor to ensure proper flashing and weatherproofing. Warranty concerns are another critical factor to consider. Many manufacturers of fire-resistant roofing materials, such as metal roofing or certain types of asphalt shingles, require certified installation to maintain the validity of their warranties. Improper DIY installation can void these warranties, leaving you financially responsible for future repairs or premature roof failure.
Time constraints also play a significant role. A DIY roof repair or even a full roof replacement can be incredibly time-consuming, especially if you’re juggling other responsibilities. A professional roofing contractor can complete the job much more quickly and efficiently, minimizing disruption to your daily life and reducing the risk of further damage from exposure to the elements. Furthermore, navigating insurance claims related to roof damage after a wildfire can be complex. Insurance companies often require detailed documentation and may scrutinize the repair work to ensure it meets industry standards and local building codes.
A professional roofing contractor can provide the necessary documentation, including detailed estimates and photographic evidence, and can work directly with your insurance adjuster to streamline the claims process. They can also ensure that the roof repair or roof replacement adheres to all applicable building codes for wildfire-prone areas, guaranteeing that your home is adequately protected against future fire risks. Opting for a Class A roofing material like tile roofing or metal roofing often requires specialized knowledge for proper installation, making a professional’s expertise invaluable. Ultimately, a professional roofing contractor has the expertise, tools, insurance, and understanding of fire-resistant roofing best practices to handle complex roofing projects safely and effectively, offering peace of mind and long-term protection for your home.
Conclusion: Prioritizing Fire Resistance for Long-Term Home Protection
Protecting your home from wildfires requires a proactive, multi-faceted approach, with fire-resistant roofing serving as a cornerstone of defense. Regular roof inspections, ideally performed twice a year, coupled with diligent maintenance, can identify and address vulnerabilities before they escalate. The strategic selection and implementation of fire-resistant materials are not merely upgrades, but essential investments in safeguarding your property and well-being. By understanding the inherent risks associated with wildfires and taking decisive, informed measures, homeowners can significantly reduce their property’s susceptibility to ember attacks and radiant heat, the primary culprits of wildfire-related structural damage.
This includes carefully considering the flammability of landscaping near the roofline and ensuring proper clearance around vents and eaves. When it comes to fire-resistant roofing, understanding material options and their associated costs is paramount. Class A roofing materials, such as metal roofing (steel, aluminum, or copper), tile roofing (clay or concrete), and even certain types of asphalt shingles treated with fire-retardant chemicals, offer the highest level of protection. While metal roofing boasts exceptional fire resistance and longevity, its initial cost can be higher compared to asphalt shingles.
Tile roofing provides excellent durability and aesthetic appeal, but its weight may necessitate additional structural support. Asphalt shingles, while generally more affordable, require careful selection to ensure they meet Class A fire-resistance standards. Making informed decisions about materials and understanding the nuances of DIY roofing versus professional roof replacement are crucial for effective wildfire protection. Navigating insurance claims related to wildfire damage can be a complex and often stressful process. Thorough documentation of roof damage, including photos and videos, is essential for substantiating your claim.
Obtaining multiple estimates from licensed roofing contractors specializing in fire-resistant roofing ensures you receive fair compensation for necessary repairs or roof replacement. Understanding your insurance policy’s coverage limits and deductibles is crucial before initiating the claims process. Be prepared to negotiate with the insurance adjuster and, if necessary, seek assistance from a public adjuster to advocate for your interests. Whether you choose to tackle minor roof repair projects yourself or enlist the expertise of a professional for a complete roof replacement, prioritizing fire resistance not only provides invaluable peace of mind but also serves as a critical safeguard for your home and family in the face of increasing wildfire threats.