Introduction: Fortifying Your Home Against the California Wildfire Threat
The California dream, with its sun-drenched landscapes and vibrant communities, faces a growing threat: wildfires. As the next decade (2030-2039) approaches, projections indicate an increase in wildfire frequency and intensity, making proactive home protection more critical than ever. Your roof, the first line of defense against these devastating events, is particularly vulnerable. This comprehensive guide empowers California homeowners in wildfire-prone areas to take control and install fire-resistant roofing, safeguarding their homes and families. We’ll delve into the unique challenges wildfires pose to roofs, explore compliant materials, provide a detailed DIY installation process, and offer essential maintenance tips, all while adhering to California Building Code Chapter 7A.
In the face of escalating California wildfires, selecting and installing fire-resistant roofing is no longer just a matter of home improvement; it’s a necessity for wildfire mitigation. Homes built with combustible roofing materials are significantly more susceptible to ignition from ember attacks, a primary cause of structural damage during wildfires. According to a recent study by the Insurance Institute for Business & Home Safety (IBHS), homes with Class A roofing are far more likely to survive a wildfire than those with lower-rated materials.
Investing in fire-resistant roofing California, therefore, is a tangible step towards securing your property and loved ones. This guide focuses on practical DIY solutions for installing roofing for wildfire zones, specifically addressing the requirements outlined in California Building Code Chapter 7A roofing. We’ll explore various Class A roofing California materials, including concrete tiles, known for their exceptional durability and fire resistance; metal roofing, offering a lightweight yet robust barrier against embers and radiant heat; and even certain types of asphalt shingles that meet stringent fire-resistance standards.
Understanding the pros and cons of each material is crucial for making an informed decision that aligns with your budget, aesthetic preferences, and the specific wildfire risks in your area. For example, while concrete tiles offer superior protection, their weight may require additional structural reinforcement, a factor to consider during your home improvement planning. Beyond material selection, proper roofing installation is paramount. Even the most fire-resistant roofing materials can fail if installed incorrectly. This guide provides a step-by-step approach to wildfire roofing DIY, emphasizing critical techniques such as proper underlayment installation, secure fastening methods, and meticulous flashing around vents and chimneys. We’ll also address common pitfalls to avoid, such as improper nailing and inadequate sealing, which can compromise the roof’s integrity and fire resistance over time. By following these guidelines and prioritizing safety, California homeowners can confidently undertake this vital home improvement project and enhance their property’s resilience against the ever-present threat of California wildfires.
Understanding the Wildfire Threat to Your Roof
Wildfires present a trifecta of threats to your roof: ember attacks, radiant heat, and direct flame exposure. Ember attacks, where burning embers are carried by the wind and land on or around your roof, are the most common cause of home ignition, accounting for the vast majority of structures lost in California wildfires. These embers, often lofted miles ahead of the main fire front, can lodge in cracks, gutters choked with dry leaves, or under eaves, igniting combustible materials like dry vegetation, accumulated debris, and even certain types of roofing underlayment.
The speed at which these seemingly small ignitions can spread is alarming, turning a minor ember landing into a full-blown house fire in a matter of minutes. Therefore, meticulous attention to detail in preventing ember accumulation is paramount for wildfire mitigation. Radiant heat, the intense thermal energy emanating from nearby fires, poses a significant threat even without direct flame contact. This heat can cause roofing materials, particularly those not specifically designed for fire resistance, to melt, warp, or ignite.
Asphalt shingles, for instance, can become pliable and even combust under intense radiant heat, leaving the underlying structure vulnerable. The intensity of radiant heat is directly related to the size and proximity of the fire, meaning even homes some distance from the immediate fire line can be at risk. Selecting roofing materials with high thermal resistance is a crucial step in defending against this threat. Concrete tiles and metal roofing, for example, offer superior protection against radiant heat compared to traditional asphalt shingles.
Direct flame exposure, while less frequent than ember attacks, represents the most immediate and devastating threat to a roof. This occurs when flames directly contact the roof structure, leading to immediate and widespread fire damage. This scenario is more likely in areas with dense vegetation close to the house or during extreme fire behavior with tall flame lengths. Even fire-resistant roofing can succumb to prolonged direct flame impingement. Understanding these threats is crucial for selecting appropriate fire-resistant roofing materials that comply with California Building Code Chapter 7A and employing proper installation techniques. Furthermore, maintaining defensible space around your home, as mandated by California law, significantly reduces the likelihood of direct flame exposure by minimizing the fuel available to burn near the structure.
Choosing the Right Fire-Resistant Roofing Material: Complying with California Building Code Chapter 7A
California Building Code Chapter 7A sets stringent standards for roofing materials in wildfire-prone areas, a critical consideration for homeowners aiming to safeguard their properties against the increasing threat of California wildfires expected between 2030-2039. To comply with Chapter 7A, your roofing material must achieve a Class A fire rating, the highest level of fire resistance recognized by the code. This rating signifies that the material has undergone rigorous testing and demonstrates superior performance in resisting flame spread and penetration, protecting your home from ember attacks, radiant heat, and direct flame exposure.
Selecting a Class A rated roofing material is not merely about code compliance; it’s about providing a crucial layer of defense for your home and family. Several materials meet this requirement, each presenting a unique blend of advantages and disadvantages that homeowners must carefully weigh. Concrete tiles are a popular choice for fire-resistant roofing in California due to their inherent durability and exceptional fire resistance. These tiles effectively block ember attacks, withstand intense radiant heat, and resist direct flame exposure, providing robust protection in wildfire zones.
With a lifespan exceeding 50 years, concrete tiles offer long-term peace of mind. Available in a wide array of styles and colors, including options that mimic the appearance of traditional clay tiles or slate, they can enhance your home’s aesthetic appeal while providing superior protection. However, the substantial weight of concrete tiles necessitates a structurally sound roof capable of bearing the load. Furthermore, the initial cost of concrete tile installation can be higher compared to other roofing options, representing a significant upfront investment.
Despite the higher initial cost, the longevity and superior protection offered by concrete tiles often make them a cost-effective choice over the lifespan of the roof. Metal roofing, particularly options crafted from steel or aluminum and bearing a Class A fire rating, presents another compelling solution for wildfire mitigation. Its lightweight nature reduces the structural demands on your home, simplifying installation and potentially saving on reinforcement costs. Metal roofing demonstrates excellent resistance to ember attacks and radiant heat, effectively shielding your home from these common wildfire threats.
With a lifespan ranging from 40 to 70 years, metal roofs offer exceptional durability and longevity. Available in a diverse palette of colors and styles, including designs that emulate shingles or tiles, metal roofing can complement various architectural styles. While the initial investment may be higher than some alternatives, the extended lifespan and minimal maintenance requirements of metal roofing translate to long-term cost savings. Homeowners should consider the potential for noise during rainfall, although this can be mitigated with proper insulation during roofing installation.
Specially manufactured asphalt shingles with a Class A fire rating offer a more budget-friendly alternative for homeowners seeking fire-resistant roofing. These shingles incorporate fire-retardant materials and a fiberglass mat, enhancing their ability to resist flame spread and ember penetration. While they offer a wide range of colors and styles to match your home’s aesthetic, their lifespan (20-30 years) is shorter compared to concrete or metal options. Consequently, asphalt shingles may require more frequent maintenance and replacement over the long term.
While offering an attractive initial cost, homeowners should factor in the potential for increased long-term expenses associated with maintenance and replacement. Careful consideration of the specific Class A rated asphalt shingles is crucial, as some may offer better fire resistance than others. Prioritize those with proven performance in wildfire-prone areas. To further aid in decision-making, consider the following expanded comparison table:
| Material | Cost | Lifespan | Aesthetic Appeal | Pros | Cons |
| —————– | ———– | ———- | —————- | —————————————————————————————————- | ———————————————————————————————————————————– |
| Concrete Tiles | High | 50+ years | High | Excellent fire resistance, durable, long lifespan, variety of styles | Heavy, requires strong roof structure, higher initial cost |
| Metal Roofing | Medium-High | 40-70 years | Medium | Lightweight, durable, excellent fire resistance, long lifespan, low maintenance | Higher initial cost, can be noisy during rain (mitigated by insulation) |
| Asphalt Shingles | Low | 20-30 years | High | Affordable, wide range of styles and colors, relatively easy to install, Class A options available | Shorter lifespan, requires more frequent maintenance, lower fire resistance than other Class A options, potential for granule loss |
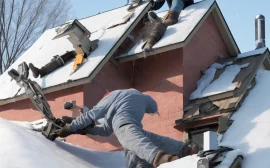
DIY Installation: A Step-by-Step Guide
**Safety First:** * **Personal Protective Equipment (PPE):** Always wear a hard hat that meets ANSI standards, safety glasses with side shields to protect against debris, heavy-duty work gloves to prevent cuts and abrasions, and sturdy work boots with excellent traction. Roofing work presents numerous hazards, and proper PPE is your first line of defense. For example, consider gloves made of leather or a synthetic blend designed for gripping roofing materials, as standard work gloves may not provide adequate protection.
* **Working at Heights:** Utilize a secure ladder that extends at least 3 feet above the roofline, ensuring it’s placed on a stable, level surface.
Employ a safety harness and lifeline attached to a secure anchor point on the opposite side of the roof or a professionally installed roof anchor. A fall from even a single-story roof can result in serious injury. Remember to inspect your safety harness before each use for any signs of wear or damage. It’s also wise to have a spotter on the ground to monitor your safety and provide assistance if needed.
* **Weather Conditions:** Never work on the roof in wet, windy, or icy conditions.
Rain makes surfaces slippery, wind can destabilize ladders and materials, and ice creates an extreme fall hazard. Even a light drizzle can significantly increase the risk of an accident. Check the weather forecast before starting any roofing work and postpone the project if inclement weather is predicted. Remember that fire-resistant roofing California is an investment, so protect yourself during the DIY installation.
* **Electrical Hazards:** Be acutely aware of overhead power lines and maintain a safe distance of at least 10 feet.
Contact your local utility company if you need to work closer than this distance. Never use metal ladders near power lines, and be extremely cautious when handling metal roofing materials. Electrocution is a serious risk, and it’s crucial to prioritize electrical safety at all times. Also, be aware of any electrical wiring that may be running underneath the existing roofing material. **Step-by-Step Installation Process:** 1. **Removing Old Roofing:** Carefully remove the existing roofing material, using a roofing shovel or pry bar.
Start at the top of the roof and work your way down, being mindful of falling debris. Dispose of the old materials properly at a designated landfill or recycling center. Some recycling centers specialize in roofing materials, diverting them from landfills. When removing old roofing, pay close attention to how the existing materials were installed. This can provide valuable insights into the roof’s construction and potential problem areas. Take photos as you go to document the process, which can be helpful for reference later.
2. **Inspecting Sheathing:** Thoroughly inspect the roof sheathing (the wooden boards underneath the roofing material) for any signs of damage, such as rot, water stains, or insect infestation.
Probe any suspicious areas with a screwdriver to check for softness. Replace any damaged sections with new sheathing of the same thickness and material, typically plywood or OSB (oriented strand board). Ensure the new sheathing is properly secured to the rafters with screws or nails. Ignoring damaged sheathing can compromise the structural integrity of your new roof and lead to leaks. Remember, the sheathing is the foundation for your fire-resistant roofing California, so ensure it’s solid.
3. **Underlayment Installation:** Install a fire-resistant underlayment over the sheathing.
Options include synthetic underlayments with a Class A fire rating, meeting California Building Code Chapter 7A roofing requirements, or traditional asphalt-saturated felt. Synthetic underlayments are generally more durable and water-resistant than felt. Overlap the underlayment layers according to the manufacturer’s instructions, typically 4-6 inches. Secure the underlayment with roofing nails or staples, ensuring they are properly spaced to prevent wind uplift. A properly installed underlayment is crucial for protecting your roof from water damage and helping it achieve its Class A fire rating, essential for roofing for wildfire zones.
4. **Material Installation:** Follow the manufacturer’s instructions meticulously for installing the chosen roofing material.
This will vary significantly depending on the material type. For concrete tiles, ensure proper interlocking and fastening, using corrosion-resistant screws or nails. For metal roofing, use appropriate screws or clips designed for thermal expansion and contraction. For asphalt shingles, overlap the shingles correctly, typically with a specific exposure, and nail them securely with roofing nails. Using the wrong fasteners or improper installation techniques can void warranties and compromise the roof’s fire resistance and weather resistance.
Consult online resources, installation videos, or even contact the manufacturer directly if you have any questions.
5. **Flashing Installation:** Install flashing around vents, chimneys, skylights, and other roof penetrations to prevent water intrusion. Use metal flashing, such as aluminum or galvanized steel, and seal it with roofing sealant. Ensure the flashing extends far enough up the penetration and onto the roofing material to effectively divert water. Proper flashing is essential for preventing leaks, which can damage the roof sheathing and lead to mold growth.
Pay particular attention to areas where the roof intersects with walls or other structures, as these are common areas for leaks to occur. Consider using a self-adhesive flashing membrane for added protection. For wildfire roofing DIY, this step is critical to ensure the longevity of your roof. **(Include high-quality images and diagrams illustrating each step here)** **Prioritizing Ember Resistance:** A critical aspect often overlooked is addressing potential ember entry points. Beyond the Class A roofing California material itself, consider using ember-resistant vent screens on all roof vents.
These screens prevent burning embers from entering the attic, a common ignition point during a wildfire. Seal any gaps or cracks in the roof’s structure with fire-resistant caulk or sealant. Pay special attention to the areas around chimneys, vents, and where the roof meets the walls. These seemingly small details can significantly improve your home’s overall wildfire resilience. Remember, wildfire mitigation is a comprehensive approach that extends beyond just the roofing material itself. **Understanding Material-Specific Techniques:** Each roofing material demands specific installation techniques.
For example, when installing concrete tiles, proper alignment and securing each tile with the correct fastener is paramount. Improper alignment can create gaps where embers can lodge, and insufficient fastening can lead to tiles dislodging during high winds. Metal roofing requires careful consideration of thermal expansion and contraction. Using the wrong fasteners or failing to account for expansion can result in buckling or warping of the metal. Asphalt shingles require precise overlap and proper nailing to ensure a watertight seal and prevent wind uplift.
Always consult the manufacturer’s installation guidelines for your chosen material and follow them meticulously. This ensures your roofing installation meets the necessary standards for fire resistance and weather protection. **Integrating with Existing Structures:** When installing fire-resistant roofing, carefully consider how it integrates with existing structures, such as chimneys, skylights, and solar panels. Ensure that these elements are properly flashed and sealed to prevent water intrusion and ember entry. If you have solar panels, verify that they are installed in accordance with fire safety regulations and that there is adequate clearance between the panels and the roof surface. Consult with a qualified solar installer to ensure your solar panel system is compatible with your fire-resistant roofing and meets all relevant safety codes. Proper integration is crucial for maintaining the overall fire resistance and weather protection of your roof.
Avoiding Common Installation Mistakes
Even experienced DIYers can make mistakes during roof installation, potentially compromising the fire resistance of your home. Here are some common pitfalls to avoid, ensuring your fire-resistant roofing California project meets both your expectations and California Building Code Chapter 7A standards. These errors can not only lead to costly repairs but also leave your home vulnerable during a wildfire. Understanding and preventing these mistakes is a crucial step in wildfire mitigation. * **Improper Nailing:** Using the wrong type of nails, such as those not corrosion-resistant, or nailing them incorrectly can compromise the roof’s integrity and fire resistance.
Always use the nails recommended by the roofing materials manufacturer; for example, when installing concrete tiles, specific nail lengths and types are required to ensure proper anchoring without causing cracking. Ensure they are driven straight and flush with the shingle or tile surface. Overdriving nails can damage the roofing material, while underdriving leaves them exposed to the elements, potentially leading to ember attack vulnerabilities. This is especially critical when installing asphalt shingles, where proper nail placement is essential for wind and fire resistance.
* **Incorrect Overlap:** Improper overlapping of roofing materials, particularly with asphalt shingles or tile roofing, can lead to water leaks and significantly reduce fire resistance. Follow the manufacturer’s instructions meticulously for proper overlap. Overlap distances are precisely calculated to ensure water runoff and prevent embers from lodging beneath the roofing. Failing to adhere to these specifications can create pathways for embers to ignite the underlayment or roof deck. For example, if installing a Class A roofing California system with specific overlap requirements, deviating from these instructions can void the fire-resistance rating.
* **Inadequate Flashing:** Failing to install flashing properly around roof penetrations, such as chimneys, vents, and skylights, can result in water damage and rot, weakening the roof’s structure and increasing its vulnerability to fire. Ensure the flashing is properly sealed with high-temperature sealant and extends far enough up the penetration to prevent water intrusion, even during heavy rainfall. Metal flashing is preferred for its durability and fire resistance. For instance, using incorrect flashing materials or techniques around a chimney can create a direct pathway for embers to enter the attic space, negating the benefits of your fire-resistant roofing system.
* **Ignoring Building Codes:** Failing to comply with local building codes, specifically California Building Code Chapter 7A roofing requirements, can result in fines, require you to redo the installation, and, more importantly, leave your home inadequately protected against wildfires. Obtain the necessary permits and follow all code requirements, which dictate the types of roofing materials allowed in wildfire zones, the installation methods, and the required fire-resistance ratings. For example, using non-compliant roofing materials, even if they seem fire-resistant, can invalidate your insurance coverage and put your home at risk.
Always verify that your chosen roofing material is listed as approved for use in California wildfire zones. * **Poor Ventilation:** Inadequate attic ventilation can lead to moisture buildup, which can damage the roof sheathing and reduce the lifespan of the roofing material. More critically, it can create a breeding ground for mold and rot, weakening the roof’s structural integrity and making it more susceptible to ignition during a wildfire. Ensure proper ventilation by installing ridge vents, soffit vents, or gable vents, as specified by local building codes.
Proper ventilation helps regulate attic temperature and humidity, preventing moisture buildup and extending the life of your roofing system. For example, insufficient ventilation can cause asphalt shingles to overheat and degrade prematurely, reducing their fire resistance. * **Neglecting Underlayment:** The underlayment, the layer between the roof deck and the roofing material, is a critical component of a fire-resistant roofing system. Using the wrong type of underlayment, or installing it incorrectly, can significantly compromise the roof’s ability to withstand ember attacks and radiant heat.
Opt for a Class A fire-rated underlayment specifically designed for use with your chosen roofing material. Ensure it is properly installed, overlapping seams according to the manufacturer’s instructions, and securely fastened to the roof deck. For example, a non-rated underlayment can quickly ignite from embers, spreading fire to the roof deck and ultimately the entire structure. * **Skimping on Materials:** Attempting to save money by using lower-quality roofing materials or cutting corners on the quantity of materials needed can be a costly mistake in the long run.
While fire-resistant roofing California can be an investment, using substandard materials can compromise the roof’s ability to withstand wildfires and other weather events. Always choose high-quality, Class A fire-rated roofing materials from reputable manufacturers. Ensure you purchase enough materials to complete the job properly, including extra for waste and repairs. For example, using thinner, less durable asphalt shingles can make your roof more vulnerable to damage from hail, wind, and embers, ultimately costing you more in repairs and replacements.
Maintenance Tips for Long-Term Fire Resistance
Proper maintenance is crucial for ensuring the long-term fire resistance of your roof, safeguarding your home against the escalating threat of California wildfires in the 2030-2039 decade. Neglecting roof maintenance can negate the benefits of even the most robust Class A fire-resistant roofing materials. Regular upkeep not only extends the lifespan of your roofing system but also ensures it continues to meet the stringent requirements of California Building Code Chapter 7A. By proactively addressing potential vulnerabilities, homeowners can significantly reduce the risk of ember attacks and radiant heat ignition, two primary causes of wildfire-related property damage.
Remember, fire-resistant roofing California is an investment that requires consistent attention. * **Regular Inspections:** Inspect your roof at least twice a year, preferably in the spring and fall, for any signs of damage. Look for cracked or missing concrete tiles, loose asphalt shingles, or damaged flashing around vents, chimneys, and skylights. Pay close attention to areas prone to water accumulation, as moisture can compromise the underlying roof sheathing and create pathways for ember penetration. Document your inspections with photos to track changes over time and provide a record for insurance purposes.
Early detection of minor issues can prevent costly repairs and maintain the integrity of your wildfire roofing DIY project. For example, a small crack in a tile, if left unaddressed, can expand during freeze-thaw cycles, eventually leading to water damage and a weakened defense against ember attacks.
* **Debris Removal:** Remove any debris, such as leaves, branches, and pine needles, from the roof and gutters. These materials are highly flammable and provide fuel for ember attacks, potentially igniting your roof and spreading the fire to your home.
Use a leaf blower or a soft-bristled brush to clear debris from the roof surface, taking care not to damage the roofing material. Clean gutters thoroughly, ensuring proper drainage to prevent water buildup and potential ice dam formation in colder months. Consider installing gutter guards to minimize debris accumulation and reduce the frequency of cleaning. In areas prone to heavy pine needle accumulation, consider using a specialized tool designed for removing needles from gutters.
* **Gutter Cleaning:** Clean your gutters regularly to prevent water from backing up and damaging the roof sheathing, fascia boards, and even the foundation of your home.
Clogged gutters can also create an ideal environment for mosquito breeding and contribute to mold growth. Ensure downspouts are properly connected and direct water away from the foundation. Consider extending downspouts or installing splash blocks to further minimize water accumulation near the house. Regular gutter cleaning is an essential part of wildfire mitigation, as dry vegetation in gutters acts as kindling for embers.
* **Tree Trimming:** Trim any trees that overhang the roof to prevent branches from falling and damaging the roofing material.
Overhanging branches also provide a pathway for embers to reach your roof more easily. Maintain a minimum clearance of 10 feet between tree branches and your roofline. Consult with a certified arborist to ensure proper tree trimming techniques that promote tree health and safety. Remove any dead or dying branches promptly, as these are more likely to break off during storms or high winds. This is particularly important for homes in California wildfire zones.
* **Moss and Algae Removal:** Remove any moss or algae growth from the roof, as it can trap moisture and damage the roofing material, especially asphalt shingles.
Moss and algae can also create a slippery surface, increasing the risk of falls. Use a gentle cleaning solution specifically designed for removing moss and algae from roofing materials. Avoid using a pressure washer, which can damage the shingles or tiles and void your warranty. Apply the cleaning solution with a soft-bristled brush or a pump sprayer, following the manufacturer’s instructions. Consider applying a moss inhibitor after cleaning to prevent future growth. Keeping your roof free of organic growth helps maintain its fire resistance and extends its lifespan.
Beyond these essential tasks, consider the long-term effects of sun exposure on your chosen roofing materials. For instance, while metal roofing offers excellent fire resistance, darker colors can absorb significant heat, potentially increasing cooling costs. Similarly, concrete tiles, known for their durability, may require periodic sealing to maintain their water resistance and prevent cracking in extreme temperatures. Asphalt shingles, a more budget-friendly option, benefit from regular granule replenishment to maintain their protective layer against UV radiation and ember intrusion. By understanding the specific needs of your roofing material and implementing a tailored maintenance plan, you can maximize its fire resistance and longevity, ensuring your home remains protected against the ever-present threat of California wildfires.
California State Resources and Rebate Programs
Several California state resources and rebate programs are available to help homeowners proactively mitigate wildfire risks, making fire-resistant roofing upgrades more accessible. The California Department of Forestry and Fire Protection (CAL FIRE) is a primary resource, offering extensive information and resources on wildfire prevention, preparedness, and defensible space strategies. Their website provides detailed guides on creating fire-resistant landscapes and hardening homes against ember attacks, a critical aspect of protecting your roof. For DIY enthusiasts, CAL FIRE also offers workshops and online training modules that cover best practices for wildfire safety around the home, including guidance on selecting and maintaining fire-resistant roofing materials.
Understanding CAL FIRE’s recommendations is a crucial first step for any homeowner in a wildfire-prone area considering a roofing project. The California Office of Emergency Services (CalOES) plays a vital role in coordinating emergency response and recovery efforts during wildfires. CalOES offers valuable guidance on emergency preparedness, including creating evacuation plans and assembling disaster supply kits. Their website features a wealth of information on how to prepare your home and family for a wildfire, with specific advice on protecting your roof from ember intrusion and radiant heat.
Furthermore, CalOES works with local governments to provide resources and support for communities affected by wildfires, which can include assistance with home repairs and rebuilding. Understanding the resources offered by CalOES can help homeowners navigate the often-complex process of recovering from a wildfire event and rebuilding with fire-resistant materials. Beyond state-level resources, your local fire department is an invaluable source of information on specific wildfire risks in your immediate area. They can provide tailored advice on how to protect your home based on local topography, vegetation, and prevailing wind patterns.
Many fire departments offer free home assessments to identify vulnerabilities and recommend specific mitigation measures, such as upgrading to a Class A fire-rated roof or improving attic ventilation to prevent ember accumulation. Building strong relationships with your local fire department and participating in community wildfire preparedness programs are essential steps in protecting your home. Moreover, actively engaging with your local fire department can provide insights into the nuances of California Building Code Chapter 7A as it applies to your specific location.
To further offset the costs associated with installing fire-resistant roofing, explore available wildfire mitigation rebate programs. Check with your local government, utility companies, and even insurance providers for potential financial incentives. Some municipalities offer rebates for installing concrete tiles or metal roofing, while others provide assistance with defensible space clearing. Utility companies may offer rebates for energy-efficient roofing options that also provide fire resistance. These programs can significantly reduce the financial burden of upgrading your roof and make fire-resistant roofing more accessible to homeowners. Be sure to carefully review the eligibility requirements and application process for each program to maximize your chances of receiving funding. Remember that these rebates, when combined with the long-term protection offered by fire-resistant roofing, represent a significant investment in your home’s safety and value as we approach the 2030s.
Securing Your Future: Investing in Wildfire Resilience
As we look towards the future, proactive measures against wildfires become increasingly vital. By investing in fire-resistant roofing and following proper installation and maintenance practices, California homeowners can significantly reduce their risk and protect their homes and families. Remember to stay informed about local wildfire risks, comply with building codes, and take advantage of available resources and rebate programs. Taking these steps will contribute to a safer and more resilient California for all. Beyond the immediate safety benefits, investing in fire-resistant roofing California offers long-term financial advantages.
Homes equipped with Class A roofing California often see increased property values and potentially lower insurance premiums. For example, a homeowner in Sonoma County who replaced their aging wood-shake roof with concrete tiles, a popular choice for roofing for wildfire zones, reported a 10% decrease in their annual homeowner’s insurance premium. This demonstrates how wildfire mitigation efforts, specifically adhering to California Building Code Chapter 7A roofing requirements, can translate into tangible savings over time. Furthermore, selecting durable roofing materials can reduce the need for frequent repairs or replacements, providing additional cost savings throughout the 2030-2039 period.
Consider the broader community impact as well. When multiple homes in a neighborhood adopt fire-resistant roofing strategies, the overall vulnerability of the area decreases. This collective action can significantly slow or even halt the spread of wildfires, protecting not only individual properties but also critical infrastructure and shared resources. Imagine a scenario where a flying ember lands on a Class A rated concrete tile roof instead of a less resistant material; the ember quickly extinguishes without igniting the roof, preventing a potential chain reaction that could engulf an entire block.
This illustrates the importance of widespread adoption of fire-resistant roofing materials in safeguarding communities from the devastating effects of California wildfires. Metal roofing and even certain asphalt shingles, when installed according to manufacturer specifications and local building codes, can offer similar protection against ember attack and radiant heat. Finally, remember that DIY wildfire roofing installation, while potentially cost-effective, requires meticulous attention to detail. Ensure proper installation techniques are followed, especially regarding nailing patterns and flashing around vents and chimneys. Regular roof maintenance, including debris removal and prompt repair of any damaged sections, is also essential for maintaining the fire-resistant properties of your roof. By proactively addressing these factors, California homeowners can secure their future and contribute to a more resilient Golden State. Staying informed about evolving best practices for roofing materials and installation techniques will further enhance your home’s defenses against the ever-present threat of wildfires.
When to Call a Professional: Ensuring Expert Installation
Installing fire-resistant roofing is a significant investment in your home’s safety and longevity, particularly crucial in California’s increasingly wildfire-prone environment. While this guide provides a comprehensive overview of the DIY process, it’s essential to recognize the complexities involved in ensuring a truly wildfire-resistant roof. Consider consulting with a qualified roofing contractor if you are unsure about any aspect of the installation, especially concerning adherence to California Building Code Chapter 7A. Professional assessment can identify subtle structural vulnerabilities that might be overlooked by a DIYer, such as inadequate sheathing or compromised flashing around chimneys and vents, all of which can become entry points for embers during a wildfire.
Remember, a seemingly small oversight can negate the benefits of even the most robust Class A roofing materials. Professional contractors bring expertise in not only installing roofing materials like concrete tiles, metal roofing, and even specialized asphalt shingles designed for fire resistance, but also in ensuring proper integration with other fire-resistant components of your home’s exterior. For example, they can advise on the appropriate fire-rated underlayment, the correct nailing patterns to prevent wind uplift (which can expose the underlayment to embers), and the proper sealing of penetrations to prevent ember intrusion.
Furthermore, a professional can handle the disposal of old roofing materials in an environmentally responsible manner, a task that can be surprisingly challenging for DIYers. Engaging a professional ensures that every detail, from the ridge vent to the eaves, contributes to a holistic wildfire defense strategy. Beyond the technical aspects of installation, a licensed roofing contractor offers the added benefit of insurance and warranty coverage. Should any issues arise after the installation, you have recourse through their insurance, protecting you from potentially costly repairs.
Moreover, many roofing material manufacturers require professional installation for their warranties to be valid. This is particularly important for high-end materials like certain types of metal roofing or specialized composite shingles. Choosing a professional isn’t just about ensuring the job is done right; it’s about protecting your investment and gaining long-term peace of mind knowing your roof is compliant with California Building Code Chapter 7A and is well-protected against ember attack, radiant heat, and even direct flame exposure.
Remember to always prioritize safety and follow best practices when working on your roof, and when in doubt, consult an expert. Finally, consider the long-term implications of a DIY installation versus a professional one, especially when it comes to potential insurance claims following a wildfire. Insurance companies may scrutinize DIY installations more closely, potentially delaying or denying claims if the work doesn’t meet stringent standards. A professional installation, backed by proper documentation and permits, provides a clear record of compliance, streamlining the claims process and ensuring you receive the compensation you deserve to rebuild after a disaster. Therefore, while the initial cost of professional installation may be higher, the long-term benefits in terms of peace of mind, warranty protection, and insurance claim support often outweigh the savings of a DIY approach, particularly in high-risk California wildfire zones during the 2030-2039 period.